
DIY projects and design tips that make your home feel cozy, warm, and uniquely yours.
Creating a home that feels like you is one of my greatest joys. Whether it’s layering cozy textures, choosing meaningful colors, or rearranging a space to work better for your everyday life, I believe good design should be both beautiful and practical. I love sharing ideas that help you make your space feel more personal, intentional, and peaceful.
Softening a Room with Window Treatments
This post contains affiliate links for products I use in my home. I may earn a small commission if you shop through these links, at no extra cost to you.

One of the easiest and most underrated ways to soften a space is through window treatments. Curtains, shades, or blinds might seem like a small detail, but they can completely change the mood of a room. They don’t just give you privacy—they filter light, frame your view, and add warmth and comfort in a way that feels inviting.
I’ve tried a handful of styles over the years, but there’s one combination I keep coming back to in my own home: woven wood shades layered with linen curtains. They bring the perfect mix of texture and softness—natural, grounded, and airy all at once. But of course, what works in my home might not be the exact fit for yours. That’s the beauty of window treatments—you can find something that suits both your style and the feeling you want your home to have.
Below, I’m sharing some of my favorite window treatment ideas that always create a soft, welcoming look.
1. Woven Wood Shades + Linen Curtains (My Current Setup)
This is the combination I personally use, and I couldn’t love it more. Woven wood shades have that beautiful, earthy texture that instantly warms up a room. They bring in that natural element that makes things feel more grounded. When you add linen curtains on top, you get the movement and softness that balances out the structured look of the shades.
What I like most is that it feels layered without being heavy. The shades can stand alone, but the curtains add that finished, cozy touch. I have this setup in our living room and bedroom, and it works equally well in both.
Style Tip: Stick with neutral-toned linen curtains in white, ivory, or soft oat for a timeless look. If you want a little more personality, you can try a faint stripe or subtle texture, but I find the simplicity of solid linen is what makes it so calming (affiliate link below).
2. Sheer Linen Curtains
Sheer linen curtains are one of the simplest ways to make a room feel soft and airy. Even on their own, they add so much. They let in natural light, create a little privacy, and add a texture that looks light but intentional. I especially love them in spaces that get a lot of sunshine—like a breakfast nook or a living room with big windows—because they let the light filter in gently instead of feeling harsh.
If you’re someone who doesn’t want a lot of fuss with layers or extra fabric, sheers are a perfect choice. They’re budget-friendly too, which makes them an easy update if you’re decorating on a smaller scale.
3. Cotton Roman Shades
Roman shades are a great option if you prefer a clean, tailored look. They’re soft, but they still have structure, which makes them work well in spaces where you want a little more polish. I like them in kitchens and bathrooms especially, since full curtains can sometimes feel like too much in smaller or more practical spaces.
Cotton fabric keeps them from looking stiff. You can choose solid colors for a simple look, or go with a small-scale pattern if you want something a little more decorative. I love the idea of using them in a kitchen window above a sink—something about a cotton Roman shade there just feels classic and homey.
4. Double Curtain Layers (Sheer + Blackout)
If you like the idea of flexibility, double curtain layers are such a good option. You hang sheer curtains for that light and airy feeling during the day, but then add blackout panels behind them for full coverage at night. It gives you the best of both worlds—softness and brightness when you want it, and privacy and coziness when you need it.
This combination can also feel really luxurious if you hang the curtains high and wide, almost like a hotel. It frames the window beautifully and adds height to the room. It’s especially nice in a bedroom where you might want to sleep in without the sun waking you up too early.
5. Soft Drapery Panels in Earthy Hues
Full-length curtains in warm, earthy tones can completely change the feel of a room. Colors like soft clay, sage green, or warm taupe bring depth without being overwhelming. They feel grounded and natural, but still soft and calming.
The fabric choice matters here too—brushed cotton or linen blends drape really nicely. I like to let curtains either “kiss” the floor or puddle just slightly for a relaxed, romantic finish. It feels lived-in and comfortable instead of stiff.
Styling Tips for a Soft, Timeless Look
No matter which option you choose, there are a few simple tricks that make window treatments look their best:
Layer textures. Combining wood, linen, or cotton adds richness without feeling fussy.
Stick with neutrals or nature-inspired tones. These shades are calming and won’t go out of style.
Use curtain rings or pleats. They add subtle movement and elegance compared to rod-pocket panels.
Hang them high and wide. Mount your curtain rod a few inches above the window and extend it wider than the frame—this makes the room feel taller and the window look bigger.
Play with length. Let curtains just touch the floor for a neat look, or puddle slightly for something more casual and cozy.
Why Window Treatments Matter
It’s easy to overlook window treatments because they feel like an afterthought, but they play such an important role in the atmosphere of your home. A bare window can make a space feel unfinished or even a little cold. Add curtains or shades, and suddenly the room feels complete, soft, and welcoming.
For me, woven wood shades with linen curtains strike the perfect balance—they bring texture, warmth, and light all together. But I also know how much joy I get from changing things up now and then, and each style I listed above has its own charm depending on the room and the mood you want to create.
At the end of the day, window treatments aren’t just practical—they set the tone. They can make a room feel cozy, bright, romantic, airy, grounded, or calm. It’s a small design choice with a big impact.
Final Thoughts
Window treatments might not be the first thing you think of when decorating, but they’re one of the best ways to make a house feel like home. Whether you love breezy sheers, cozy drapery, or layered shades and curtains, there’s something about fabric and texture at the windows that softens everything around it.
I’ve loved the way woven wood shades and linen curtains work together in my home, but I also appreciate how many different options are out there. If you’re looking to bring a little warmth and comfort into your space, start with your windows. You’ll be surprised at how much difference it makes.
By Leah Ann Grace
The 15-Minute Daily Reset: How I Keep My Home Feeling Fresh Without Hours of Cleaning
Some days, it feels like the to-do list will never end. Between work, errands, cooking, and keeping up with life, the idea of spending hours cleaning my home just isn’t realistic. Yet, I’ve found that when my space feels messy or cluttered, my mind feels the same way—scattered, restless, and weighed down.
That’s when I discovered the power of the 15-Minute Daily Reset.
It’s not a deep clean, it’s not about perfection, and it’s certainly not about impressing anyone. This simple daily rhythm is about keeping my home feeling fresh, welcoming, and functional—without burning out. Think of it as pressing a little “reset” button on your space each day.
The best part? It only takes fifteen minutes. And once you turn it into a habit, it’s amazing how much lighter and calmer your home will feel.
Why a Daily Reset Works
Here’s the truth: small, consistent habits make the biggest difference in how our homes feel. Letting dishes pile up for a week or ignoring laundry until you’re out of socks turns those chores into overwhelming mountains.
The 15-Minute Reset works because:
It’s short and manageable—you can fit it in before bed, after dinner, or even in the morning.
It keeps your home in a state of low-maintenance cleanliness, so you’re never starting from zero.
It builds a sense of peace—you wake up or come home to a space that feels cared for.
It’s flexible—you can tailor it to what matters most in your home.
How to Do the 15-Minute Daily Reset
This isn’t about following a rigid checklist—it’s about hitting the most visible and high-impact spots in your home so everything feels “put together” again.
Here’s my personal flow:
1. Start with the Kitchen (5 minutes)
The kitchen is the heart of the home, but it’s also the fastest to spiral into chaos. I start here because it instantly makes the whole home feel cleaner.
Load or start the dishwasher (or wash any dishes in the sink).
Wipe down the counters and stove.
Put away any stray items—mail, cups, snacks, etc.
Tip: If you’ve already done the dinner cleanup, you can use this time to wipe appliances or sweep.
2. Tidy the Living Spaces (5 minutes)
Next, I move into the living room, dining room, or whatever main space we use the most. These are the first places we see when we walk in, so a quick reset here makes a big impact.
Fluff pillows and fold blankets.
Clear surfaces—coffee table, side tables, dining table.
Put books, remotes, or toys back in their spots.
Tip: Keep a decorative basket in the living room to toss in anything that belongs elsewhere—you can empty it later when you have time.
3. Quick Bedroom Reset (3 minutes)
The bedroom often gets neglected because guests rarely see it, but it’s where we begin and end each day.
Make the bed (if it’s not already done).
Clear nightstands of cups, clutter, and loose items.
Pick up clothes from the floor or chair and put them away.
Tip: If you can only do one thing here, make the bed. It instantly makes the whole room look cleaner.
4. Bathroom Sweep (2 minutes)
Bathrooms can feel instantly fresher with just a little attention.
Wipe the sink and faucet.
Hang or straighten towels.
Put away toiletries or hair tools.
Tip: Keep cleaning wipes or a microfiber cloth in the bathroom so you can do this in under two minutes.
Time-Saving Tricks to Make It Easier
Use baskets or bins: Toss loose items in a basket and sort later when you have more time.
Work top to bottom: Clear surfaces first, then sweep or wipe if needed.
Set a timer: It keeps you focused and turns cleaning into a mini challenge.
Pair it with something enjoyable: Put on a favorite playlist, podcast, or audiobook.
When to Do Your Reset
The beauty of the 15-Minute Reset is that it’s flexible—you can fit it in wherever it makes sense for your day.
Morning reset: Helps you start the day with a fresh home.
Afternoon reset: Clears the chaos before the evening rush.
Evening reset: My favorite—going to bed with a tidy home means waking up to peace.
For me, evenings work best. After dinner cleanup, I do a quick sweep of the house, and then I can relax for the night without thinking about messes waiting for me in the morning.
The Mindset Shift
It’s easy to think, “It’s just 15 minutes—how much can that really do?” But here’s the thing: it’s not just about the cleaning—it’s about the habit.
Each time you do a reset, you’re training yourself (and anyone else in your household) to:
Put things away right after using them.
Notice and care for your surroundings.
Create an environment that supports rest and creativity.
It’s also an act of stewardship—taking care of the space you’ve been given, even in small ways.
When Life Gets Messy
Some days, you might not even have 15 minutes—and that’s okay. On those days, focus on one small thing that will make the biggest difference for your mood.
Clear the kitchen sink.
Make the bed.
Fluff the pillows in the living room.
The point isn’t to do it perfectly every single day. The point is to keep showing up for your home in small, consistent ways.
Turning It Into a Family Routine
If you share your home with others, you don’t have to do the reset alone. Make it a team effort:
Set a timer for 5–15 minutes.
Give each person an area to tackle.
Make it a game—play upbeat music and see how much you can get done before the timer goes off.
This not only lightens your workload but also teaches kids and other family members to care for the home too.
The Reward
Once you make the 15-Minute Daily Reset part of your rhythm, you’ll notice:
Less stress and overwhelm.
A home that’s easier to maintain.
More time for the things you actually enjoy.
Instead of scrambling to clean before guests arrive or feeling like you’re always behind, you’ll find that your home stays at a steady, comfortable baseline.
And honestly, the peace that comes from walking into a room and seeing it tidy? That’s worth way more than 15 minutes.
Your home doesn’t have to be spotless to feel cared for.
It just needs a little daily love—fifteen minutes at a time.
By Leah Ann Grace
Best Air-Purifying Indoor Plants: Breathe Cleaner, Live Better
This post contains affiliate links for products I use in my home. I may earn a small commission if you shop through these links, at no extra cost to you.
Indoor air quality isn’t something most of us think about every day, but it plays a big role in our overall health. Between cleaning products, furniture finishes, dust, and even cooking fumes, our homes can harbor invisible pollutants. While air purifiers are one option, there’s a more beautiful — and natural — solution: indoor plants.
Certain houseplants act as miniature air filters, pulling toxins from the air and releasing clean oxygen back into your living space. Not only do they freshen your home, but they also bring warmth, color, and life into the rooms where we spend the most time.
In this guide, I’m sharing my favorite air-purifying plants — including the one that first made me fall in love with houseplants, my spider plant. Each plant on this list is beautiful, functional, and a perfect candidate for making your home feel healthier and more vibrant.
Why Choose Air-Purifying Plants?
You might be wondering — how exactly do plants clean the air? Through a process called phytoremediation, plants absorb harmful airborne chemicals through their leaves and roots, breaking them down or storing them safely. Many also release moisture into the air, improving humidity levels and reducing respiratory irritation.
Some of the most common household toxins they help remove include:
Formaldehyde – Found in furniture, flooring, and cleaning products
Benzene – Common in paints, plastics, and synthetic fabrics
Carbon monoxide – Produced by gas stoves and heaters
Xylene and toluene – Found in adhesives, nail polish, and paint thinners
By strategically placing air-purifying plants around your home, you can help counteract these pollutants naturally.
1. Spider Plant (Chlorophytum comosum)
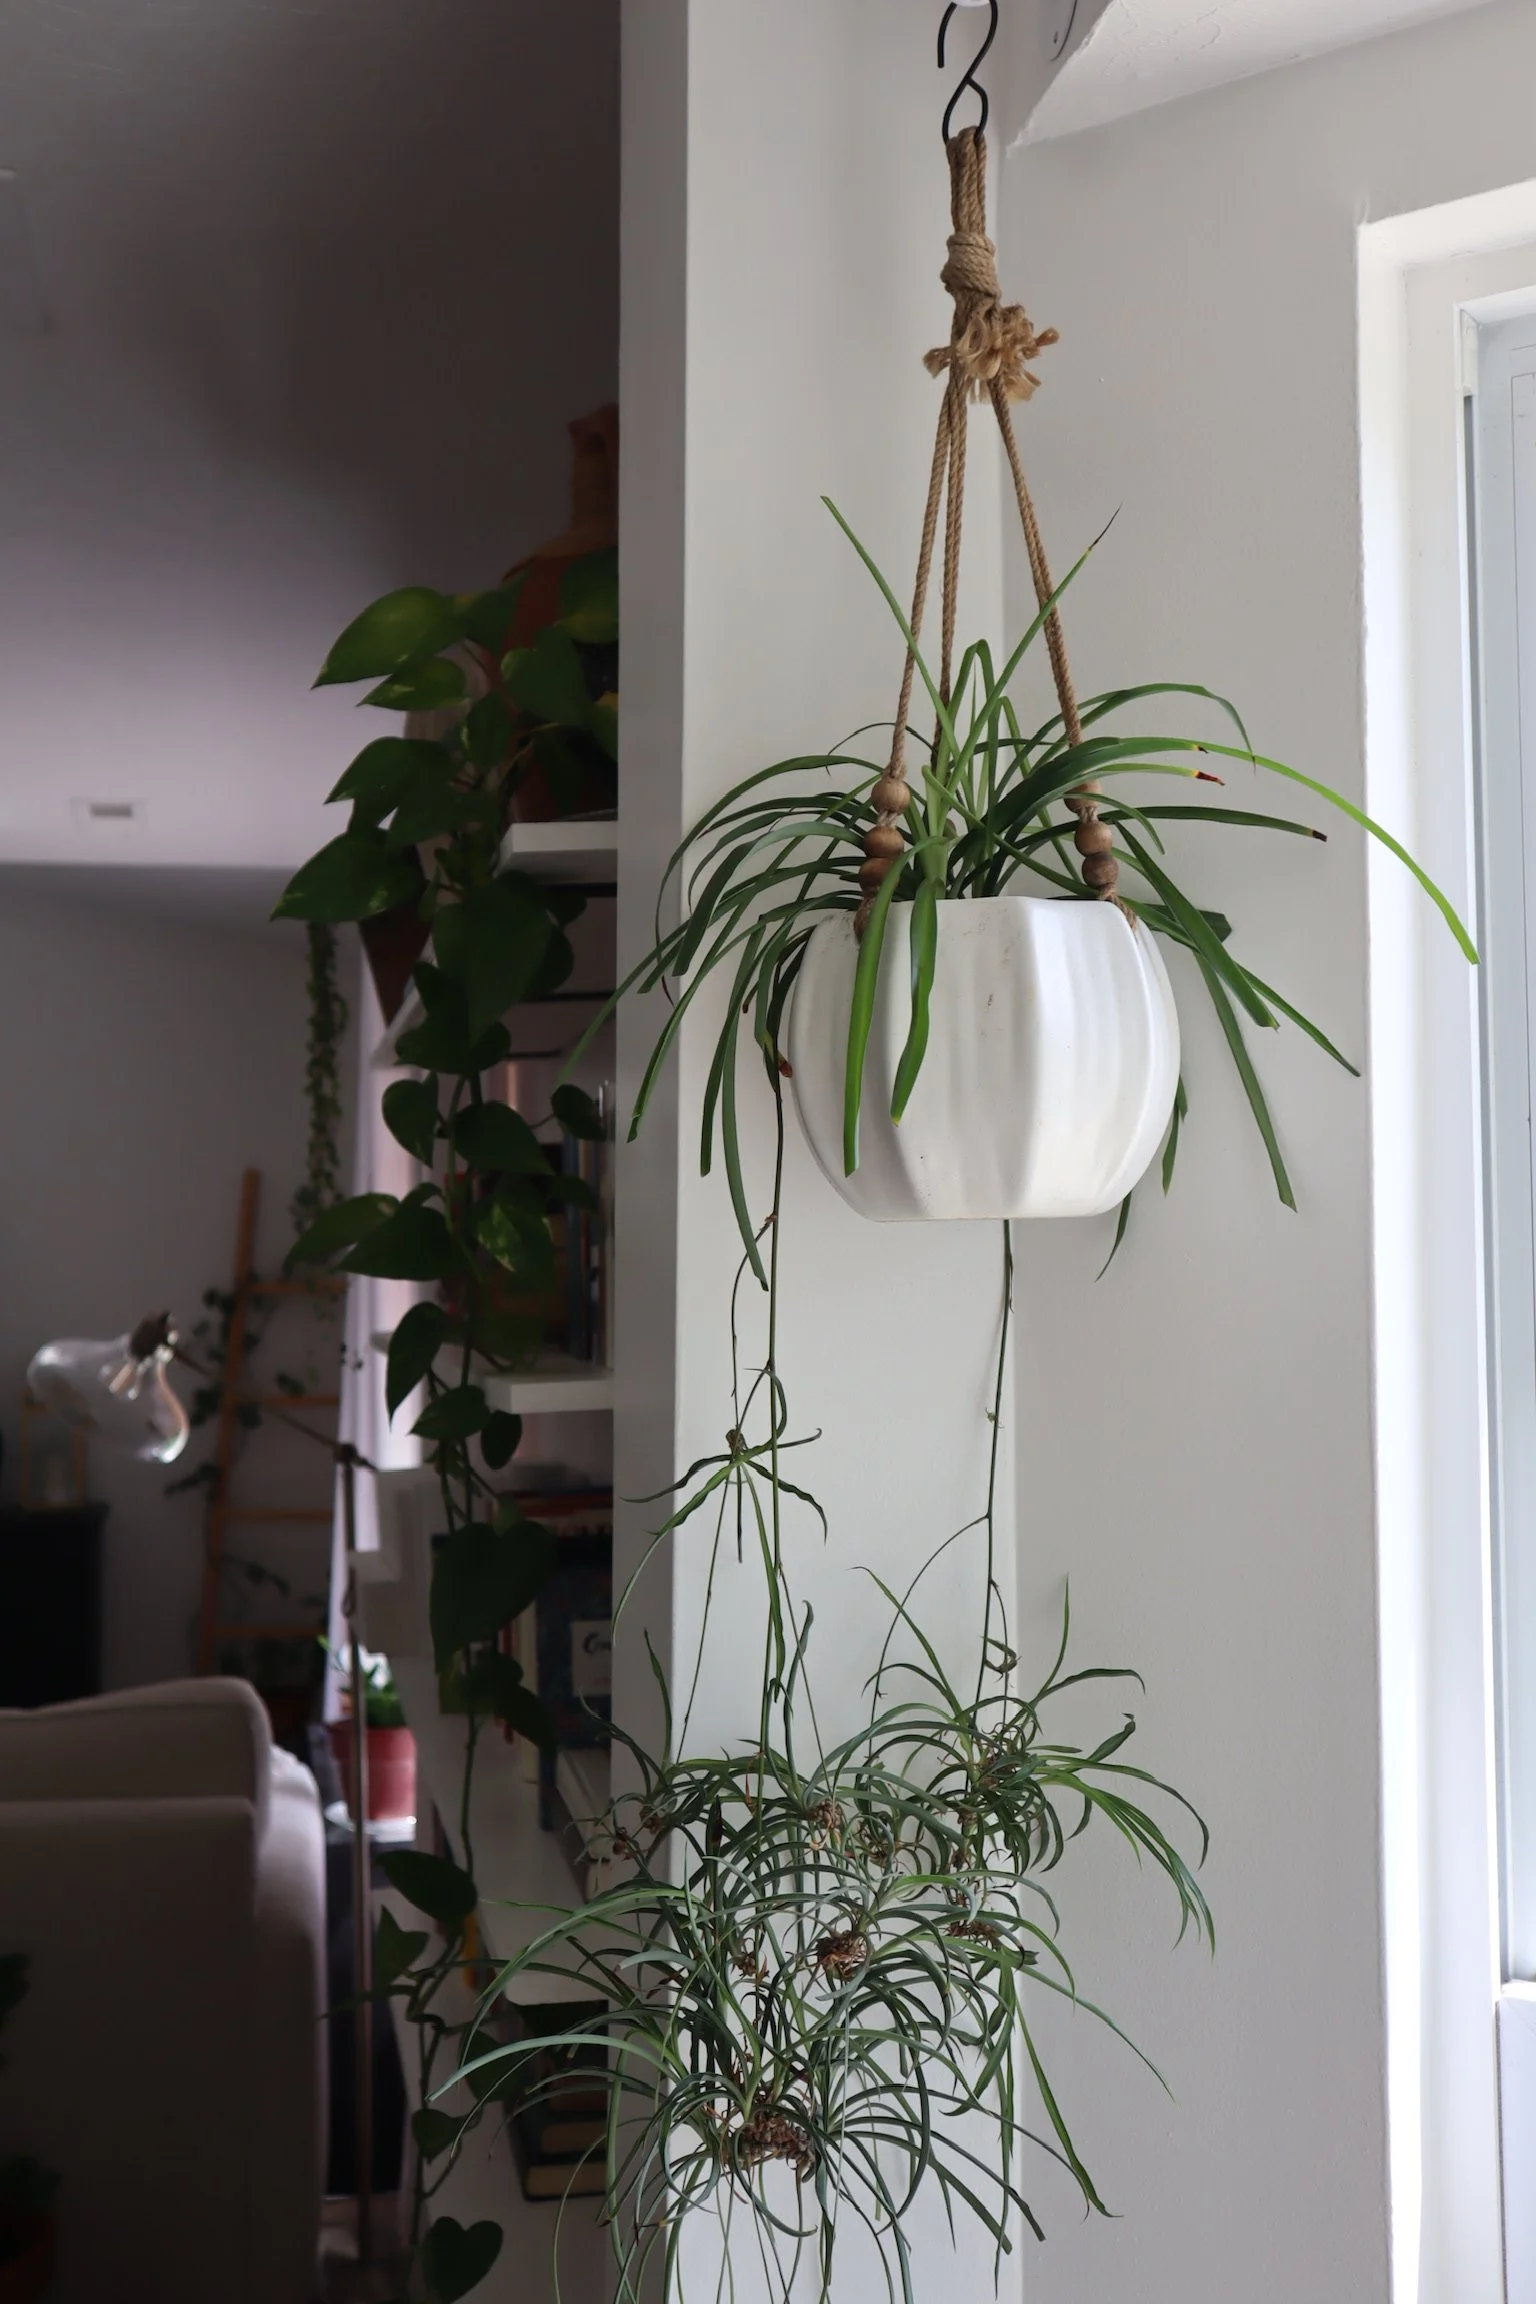
I have to start with my own spider plant, because it’s not only a superstar at cleaning the air, but also one of the easiest plants to care for. Its long, arching leaves of green add a soft, graceful touch to any space.
Air-purifying benefits:
Removes carbon monoxide, formaldehyde, and xylene from indoor air
Produces oxygen and slightly increases humidity
Safe for both pets and children
Care tips:
Light: Thrives in bright, indirect light but tolerates lower light conditions
Water: Keep soil evenly moist, letting the top inch dry between waterings
Bonus: Produces adorable baby “spiderettes” that you can propagate into new plants for free
I keep mine near a sunny window in my living room where the leaves can spill over the edge of the pot. It’s happy year-round and never fails to lift my mood. (affiliate link)
2. Peace Lily (Spathiphyllum)
The peace lily is one of the most recognizable air-cleaning plants, thanks to its elegant white blooms that stand out against deep green leaves. It’s not technically a lily but gets its name from the white “spathe” surrounding its flower spike, which resembles a calla lily.
Air-purifying benefits:
Excels at removing mold spores, benzene, formaldehyde, and trichloroethylene
Helps maintain indoor humidity levels
Care tips:
Light: Prefers medium to low indirect light
Water: Keep soil consistently moist, but don’t overwater
Caution: Toxic to pets if ingested
Peace lilies also give you a visual signal when they need water — their leaves droop dramatically, but perk right back up within hours of a drink. (affiliate link)
3. Areca Palm (Dypsis lutescens)
If you love a tropical vibe, the areca palm is a fantastic choice. With its feathery, arching fronds, it brings a breezy, resort-like feel into your home. It’s also one of the best natural humidifiers among houseplants.
Air-purifying benefits:
Removes toxins like xylene and toluene
Increases indoor humidity, great for dry winter air
Care tips:
Light: Bright, indirect light is ideal
Water: Keep soil slightly moist but not soggy
Pet-safe: Yes, non-toxic to cats and dogs
The areca palm can grow quite tall indoors, making it a great floor plant for empty corners. (affiliate link)
4. Boston Fern (Nephrolepis exaltata)
Boston ferns are lush, full, and a bit dramatic — in the best way. Their finely divided fronds create a soft, feathery texture that’s beautiful in hanging baskets or on plant stands.
Air-purifying benefits:
Excellent at removing formaldehyde and xylene
Adds humidity to dry rooms
Care tips:
Light: Prefers bright, indirect light
Water: Needs consistent moisture and higher humidity to thrive
Pet-safe: Yes, non-toxic to cats and dogs
Boston ferns can be a little more high-maintenance than some plants, but the payoff is a truly show-stopping display. (affiliate link)
5. Rubber Plant (Ficus elastica)
With its broad, glossy leaves, the rubber plant is bold and striking. It’s also a quiet workhorse at cleaning the air, especially for removing formaldehyde.
Air-purifying benefits:
Removes formaldehyde and other airborne toxins
Large leaves mean more surface area for filtering air
Care tips:
Light: Prefers bright, indirect light
Water: Allow the top 1–2 inches of soil to dry between waterings
Caution: Toxic to pets if ingested
Rubber plants can be grown as compact tabletop plants or trained into tall statement trees over time. (affiliate link)
Tips for Maximizing Air-Purifying Benefits
While having just one or two plants is better than none, the greatest air-cleaning effect comes from having multiple plants throughout your home. NASA’s famous Clean Air Study suggests at least one medium-sized plant for every 100 square feet of space.
Here are a few tips to get the most from your air-purifying plants:
Place them in the rooms you use most (living room, bedroom, home office)
Wipe leaves regularly to remove dust, which can block their air-filtering ability
Keep them healthy with proper watering, light, and occasional fertilizing
Pairing Plants for Style and Health
One of my favorite things about air-purifying plants is how well they mix and match. For example, my spider plant pairs beautifully with my pothos on a nearby shelf — the two have different shapes and growth habits, but together they create a lush, layered look.
You could create a clean-air corner in your home by combining:
A tall floor plant like the Areca Palm
A medium-sized tabletop plant like the Peace Lily
A hanging or trailing plant like the Spider Plant or Boston Fern
This way, you’re cleaning the air at multiple levels in the room while also creating a gorgeous focal point.
Final Thoughts
Air-purifying plants aren’t just a home décor trend — they’re a simple, natural way to make your space healthier and more inviting. From my cheerful spider plant to the dramatic Boston fern, each plant brings its own charm while quietly working in the background to freshen the air.
If you’re just starting your plant journey, pick one or two from this list and place them where you’ll see them often. Over time, you can build your own little indoor oasis that both looks beautiful and supports your well-being.
Next in this series, I’ll share my favorite easy-care plants for beginners — perfect for anyone who wants the joy of greenery without the stress of high-maintenance care.
By Leah Ann Grace
How to Make Your Home Feel Warm and Cozy with Lighting
This post contains affiliate links for products I use in my home. I may earn a small commission if you shop through these links, at no extra cost to you.
When we think about what makes a home feel warm, welcoming, and lived-in, our minds usually go straight to things like furniture, paint colors, or decor. And while those are all important, one of the most powerful and often overlooked elements in creating a cozy space is lighting. The right lighting does more than just help us see—it affects how we feel. It shapes the mood of a room and creates the kind of environment where we want to rest, gather, and live life.
Whether you’re curling up with a good book, enjoying dinner with friends, or winding down at the end of a long day, lighting sets the tone for everything. And the good news? It doesn’t have to be expensive or complicated to get it right. With just a few simple changes, you can transform your space into something that feels more peaceful and inviting.
Let’s walk through some easy and effective ways to use lighting to make your home feel cozier.
1. Use Layers of Light
Think of lighting like layers of clothing. Each layer serves a purpose—some are functional, some are about comfort, and some are just about how everything feels together.
In a well-lit room, you want to aim for three layers of light:
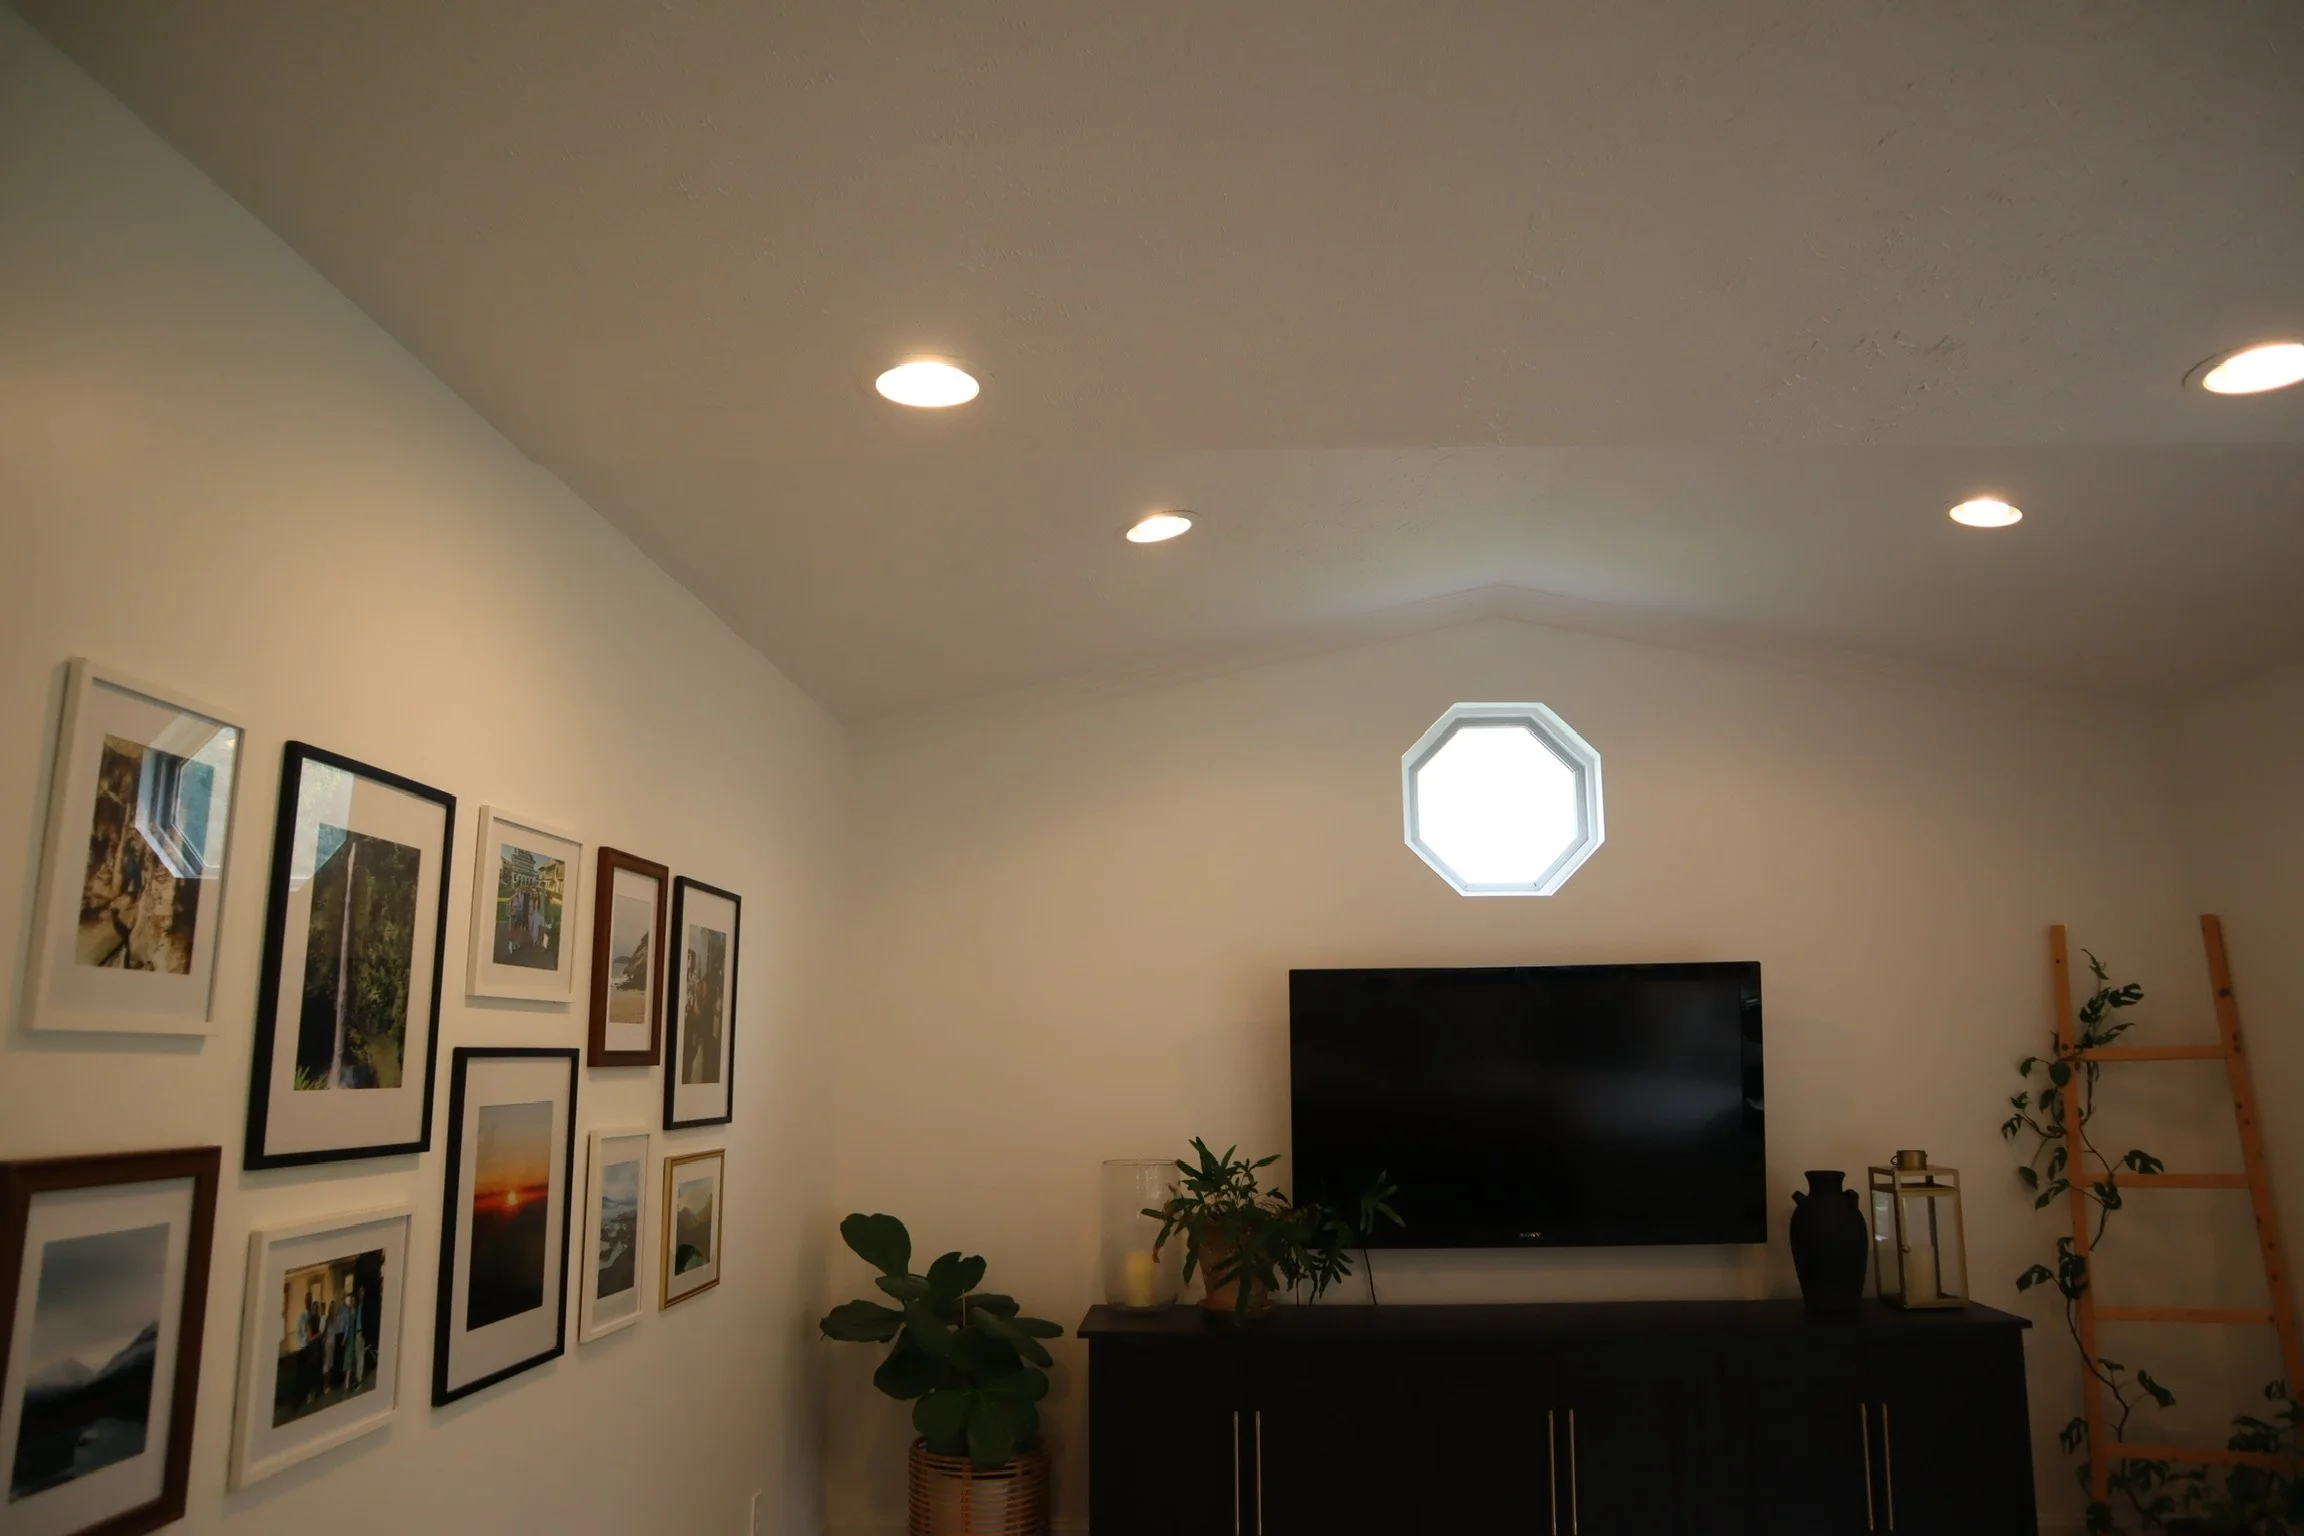
Ambient lighting: This is your main source of light, usually from overhead fixtures like ceiling lights or recessed lights. It gives the room general brightness and helps everything feel open and clear.
Task lighting: This is lighting that helps you do something specific—like reading, cooking, or working. Desk lamps, floor lamps by a chair, or under-cabinet lights in the kitchen are all examples.

Accent lighting: This is where coziness really comes in. Accent lights add warmth and mood. Think string lights, wall sconces, fairy lights, candles, or even a soft night light in a hallway.
By combining all three of these types of lighting in each room, you create depth and flexibility. You can adjust the lighting based on the time of day, the task you’re doing, or just the mood you want to create.
2. Choose Warm Bulbs Instead of Cool
One of the easiest ways to make your home feel cozier is to switch to warm white light bulbs. Light bulbs are measured in something called Kelvins (K), and the color of the light they give off falls into different ranges:
2700K–3000K: These are warm white bulbs. They give off a soft, golden light that feels relaxing and natural—great for living rooms, bedrooms, and dining spaces.
4000K and above: These are cooler or “daylight” bulbs. They’re great for workspaces, garages, or bathrooms, but they can feel too bright and harsh in rooms where you want to feel relaxed.
If your space ever feels too cold or sterile, your light bulb temperature could be part of the reason. Try switching to warm bulbs and see what a difference it makes.
3. Add Dimmers for More Control
Having the ability to dim your lights is one of the easiest and most effective ways to create a cozy mood. Bright lights are great during the day or when you’re doing a task, but in the evening, dimming the lights helps your body and mind wind down.
If your overhead lights use LED bulbs, look for ones that are dimmable. Many newer LED fixtures or bulbs work with dimmer switches—or you can use smart bulbs that let you control brightness and color warmth right from your phone.
In our home, we use dimmable LED lights for the main ceiling lighting. It’s so nice to be able to turn the brightness down after dinner or when we’re watching a movie. It instantly makes the room feel more peaceful.
4. Use Lamps for a Softer Feel
Lamps are such a simple way to soften a space. They provide gentle light at eye level, which feels more comforting and less harsh than overhead lighting.
A few tips for using lamps well:
Place them in corners, next to seating, or on side tables to create little “pockets” of warm light.
Use them as task lighting too—for reading, crafting, or working at a desk.
Choose lamps with soft shades, curved shapes, or textured finishes to bring character into your space.
I love using lamps in the living room and bedroom. They give off just the right amount of glow, and I often use them instead of the main lights in the evening.
5. Add Candlelight for Extra Warmth
Candlelight adds a soft flicker that no bulb can truly replace. It’s one of the oldest and most timeless ways to make a space feel inviting.
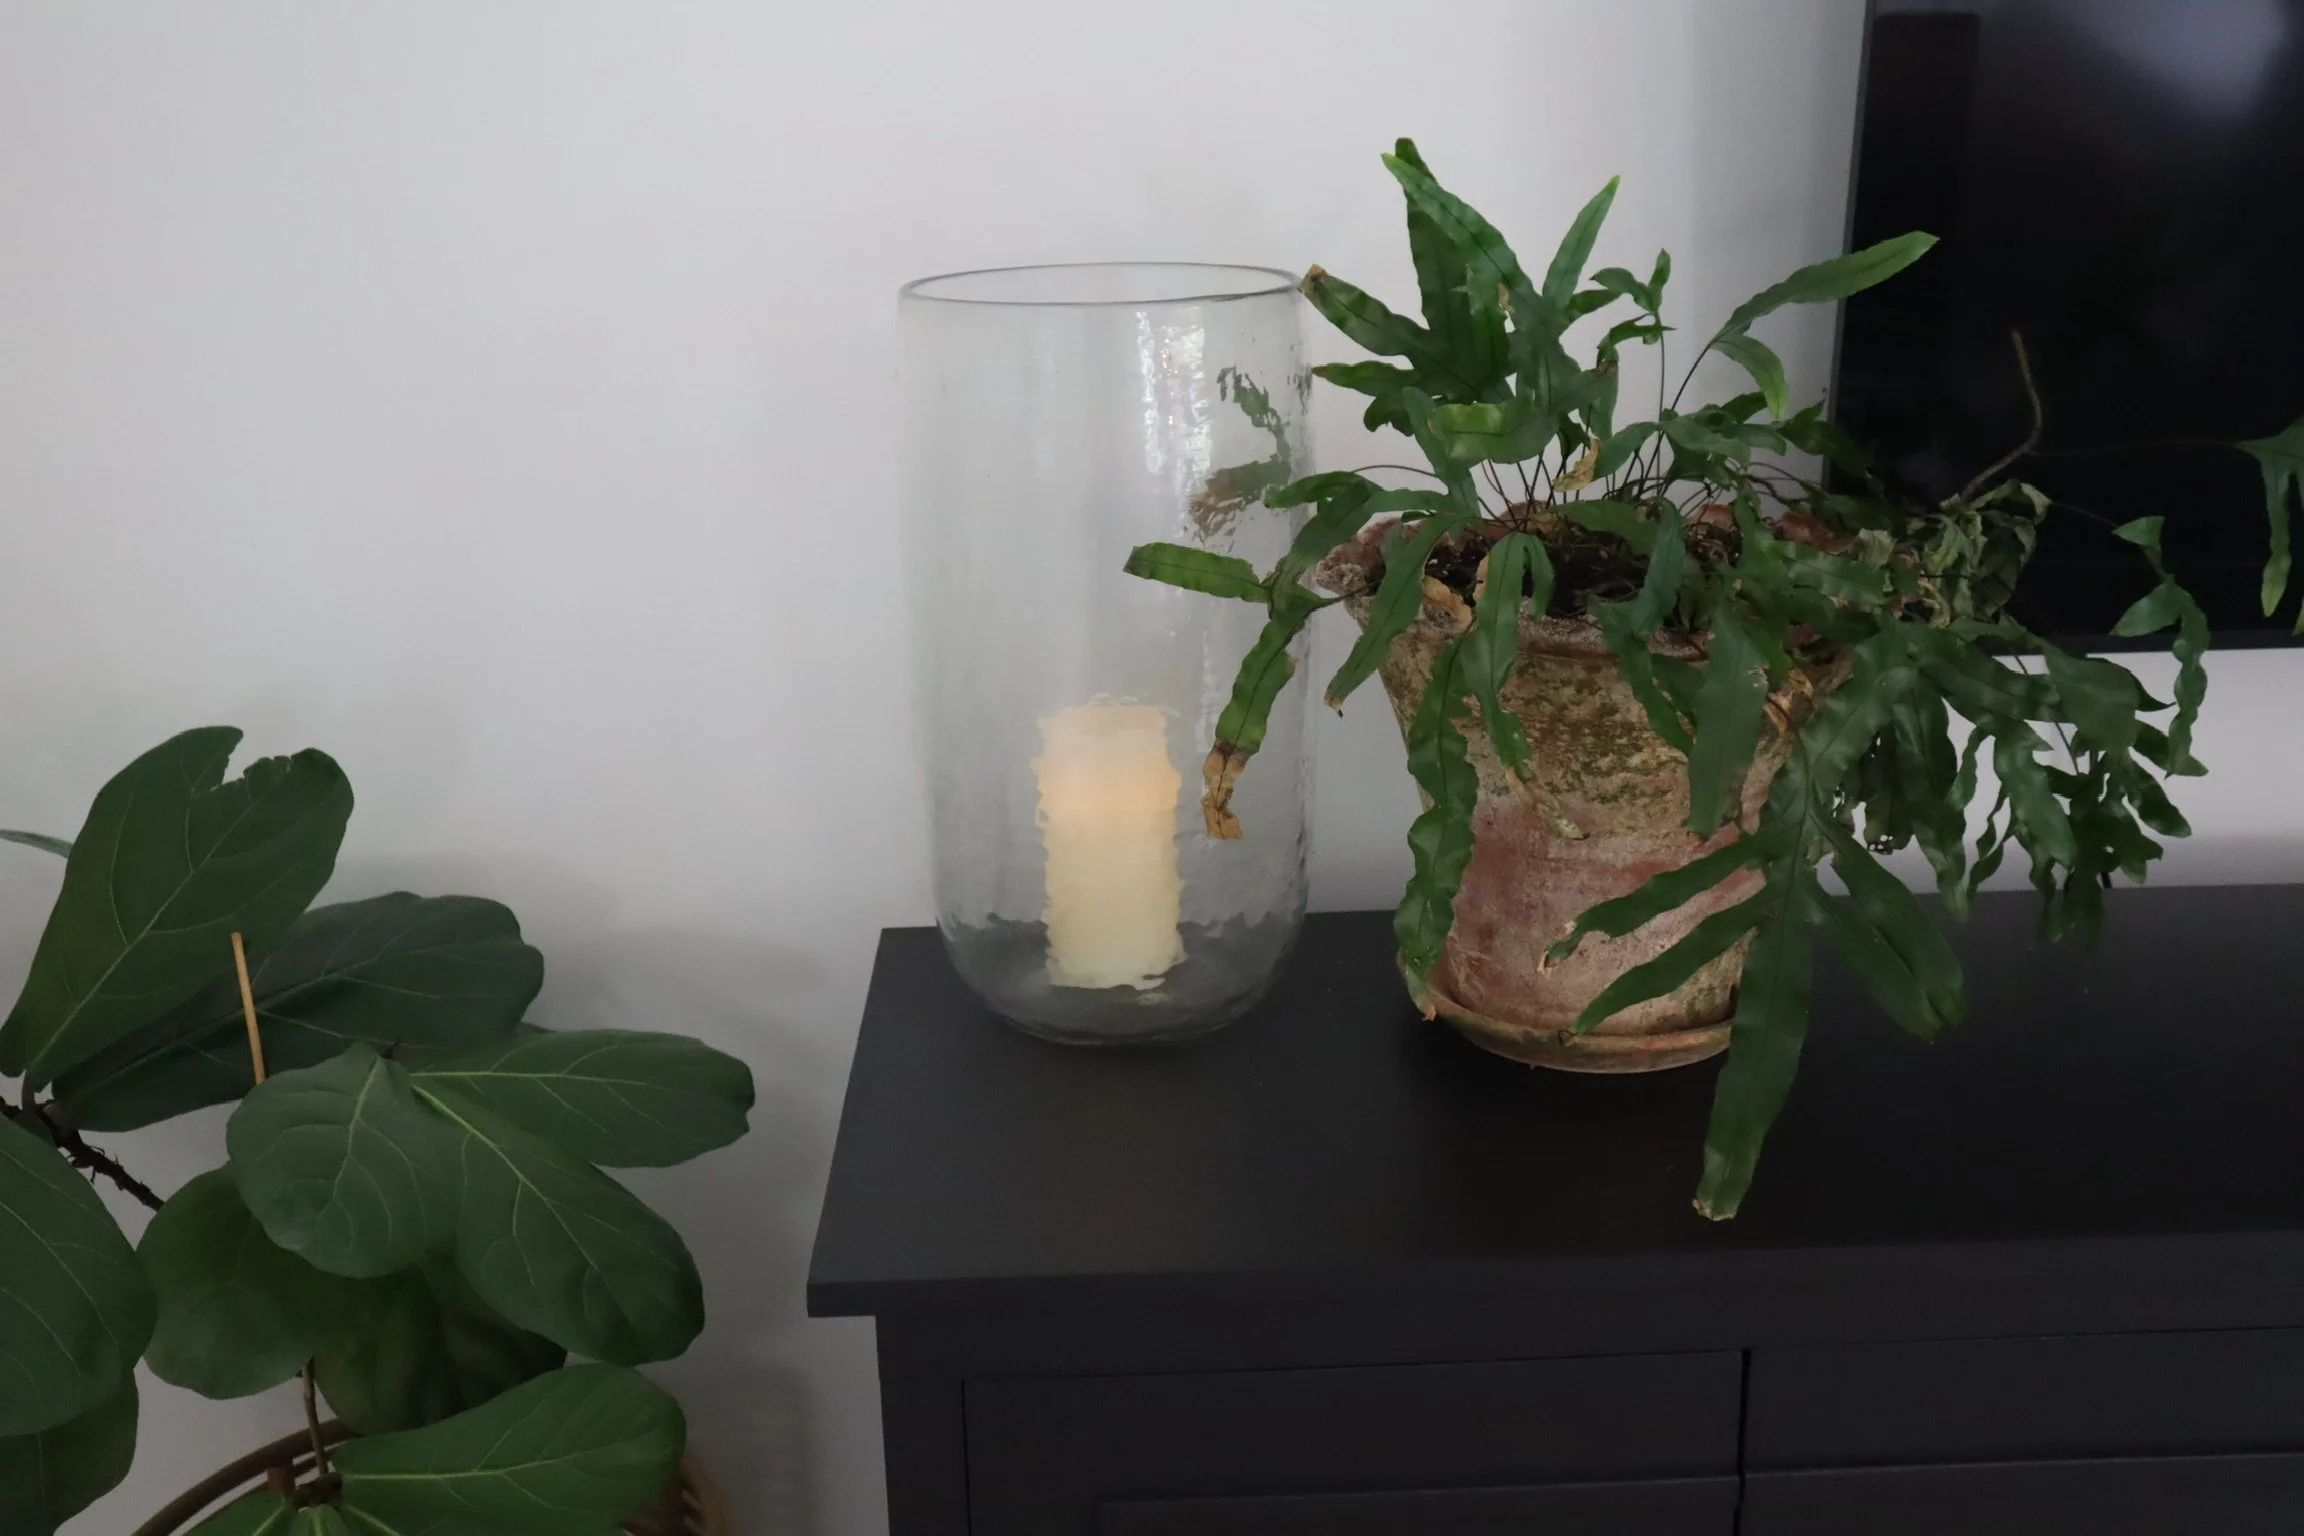
If you’re not comfortable using real candles all the time—or want a safer option—battery-powered candles are a wonderful alternative. Many of them now flicker realistically and come with timers or remotes for convenience. I like placing them in:
Glass vases or hurricanes on coffee tables or shelves
Lanterns on the floor or on the porch
Candle holders or candlesticks on the dining table or mantel
They look beautiful grouped together, and they don’t give off any heat or smoke, so you can safely leave them “on” in the background as mood lighting.
Here’s a link to a great option of battery-powered candles (affiliate link):
Real candles are also lovely if you prefer them—just always be safe, especially around kids or pets.
6. Make the Most of Natural Light
During the day, one of the best ways to bring warmth into your space is by opening up to natural light. Pull back the curtains, open the blinds, and let the sun shine in.
Even on cloudy days, natural light brings a softness that artificial light can’t always match.
Then, as the day winds down, use sheer curtains, linen drapes, or woven shades to filter harsh evening light or streetlight glare. This helps your home feel private, peaceful, and calm.
Final Thoughts
Lighting really does make all the difference when it comes to how your home feels. It’s not just about brightness—it’s about atmosphere, comfort, and making a space that feels like you.
To recap:
Use layered lighting: ambient, task, and accent lighting all work together.
Choose warm white bulbs (2700K–3000K) for a cozy, natural glow.
Add dimmers or use smart bulbs to control brightness and color warmth.
Use lamps to add softness and help with specific tasks.
Light candles—real or battery-powered—for a gentle flicker of charm.
Let natural light shine in during the day and soften it in the evening.
Small lighting changes can make a huge difference. So if your room ever feels a little off or not quite “homey” enough, don’t rush to rearrange everything—try just turning on a lamp or lighting a candle. You might be surprised how much warmer and more inviting your space becomes.
By Leah Ann Grace
How to Make Soy Candles at Home
Using Essential Oils and Repurposed Containers to Create a Cozy, Natural Space
This post contains affiliate links for products I use in my home. I may earn a small commission if you shop through these links, at no extra cost to you.
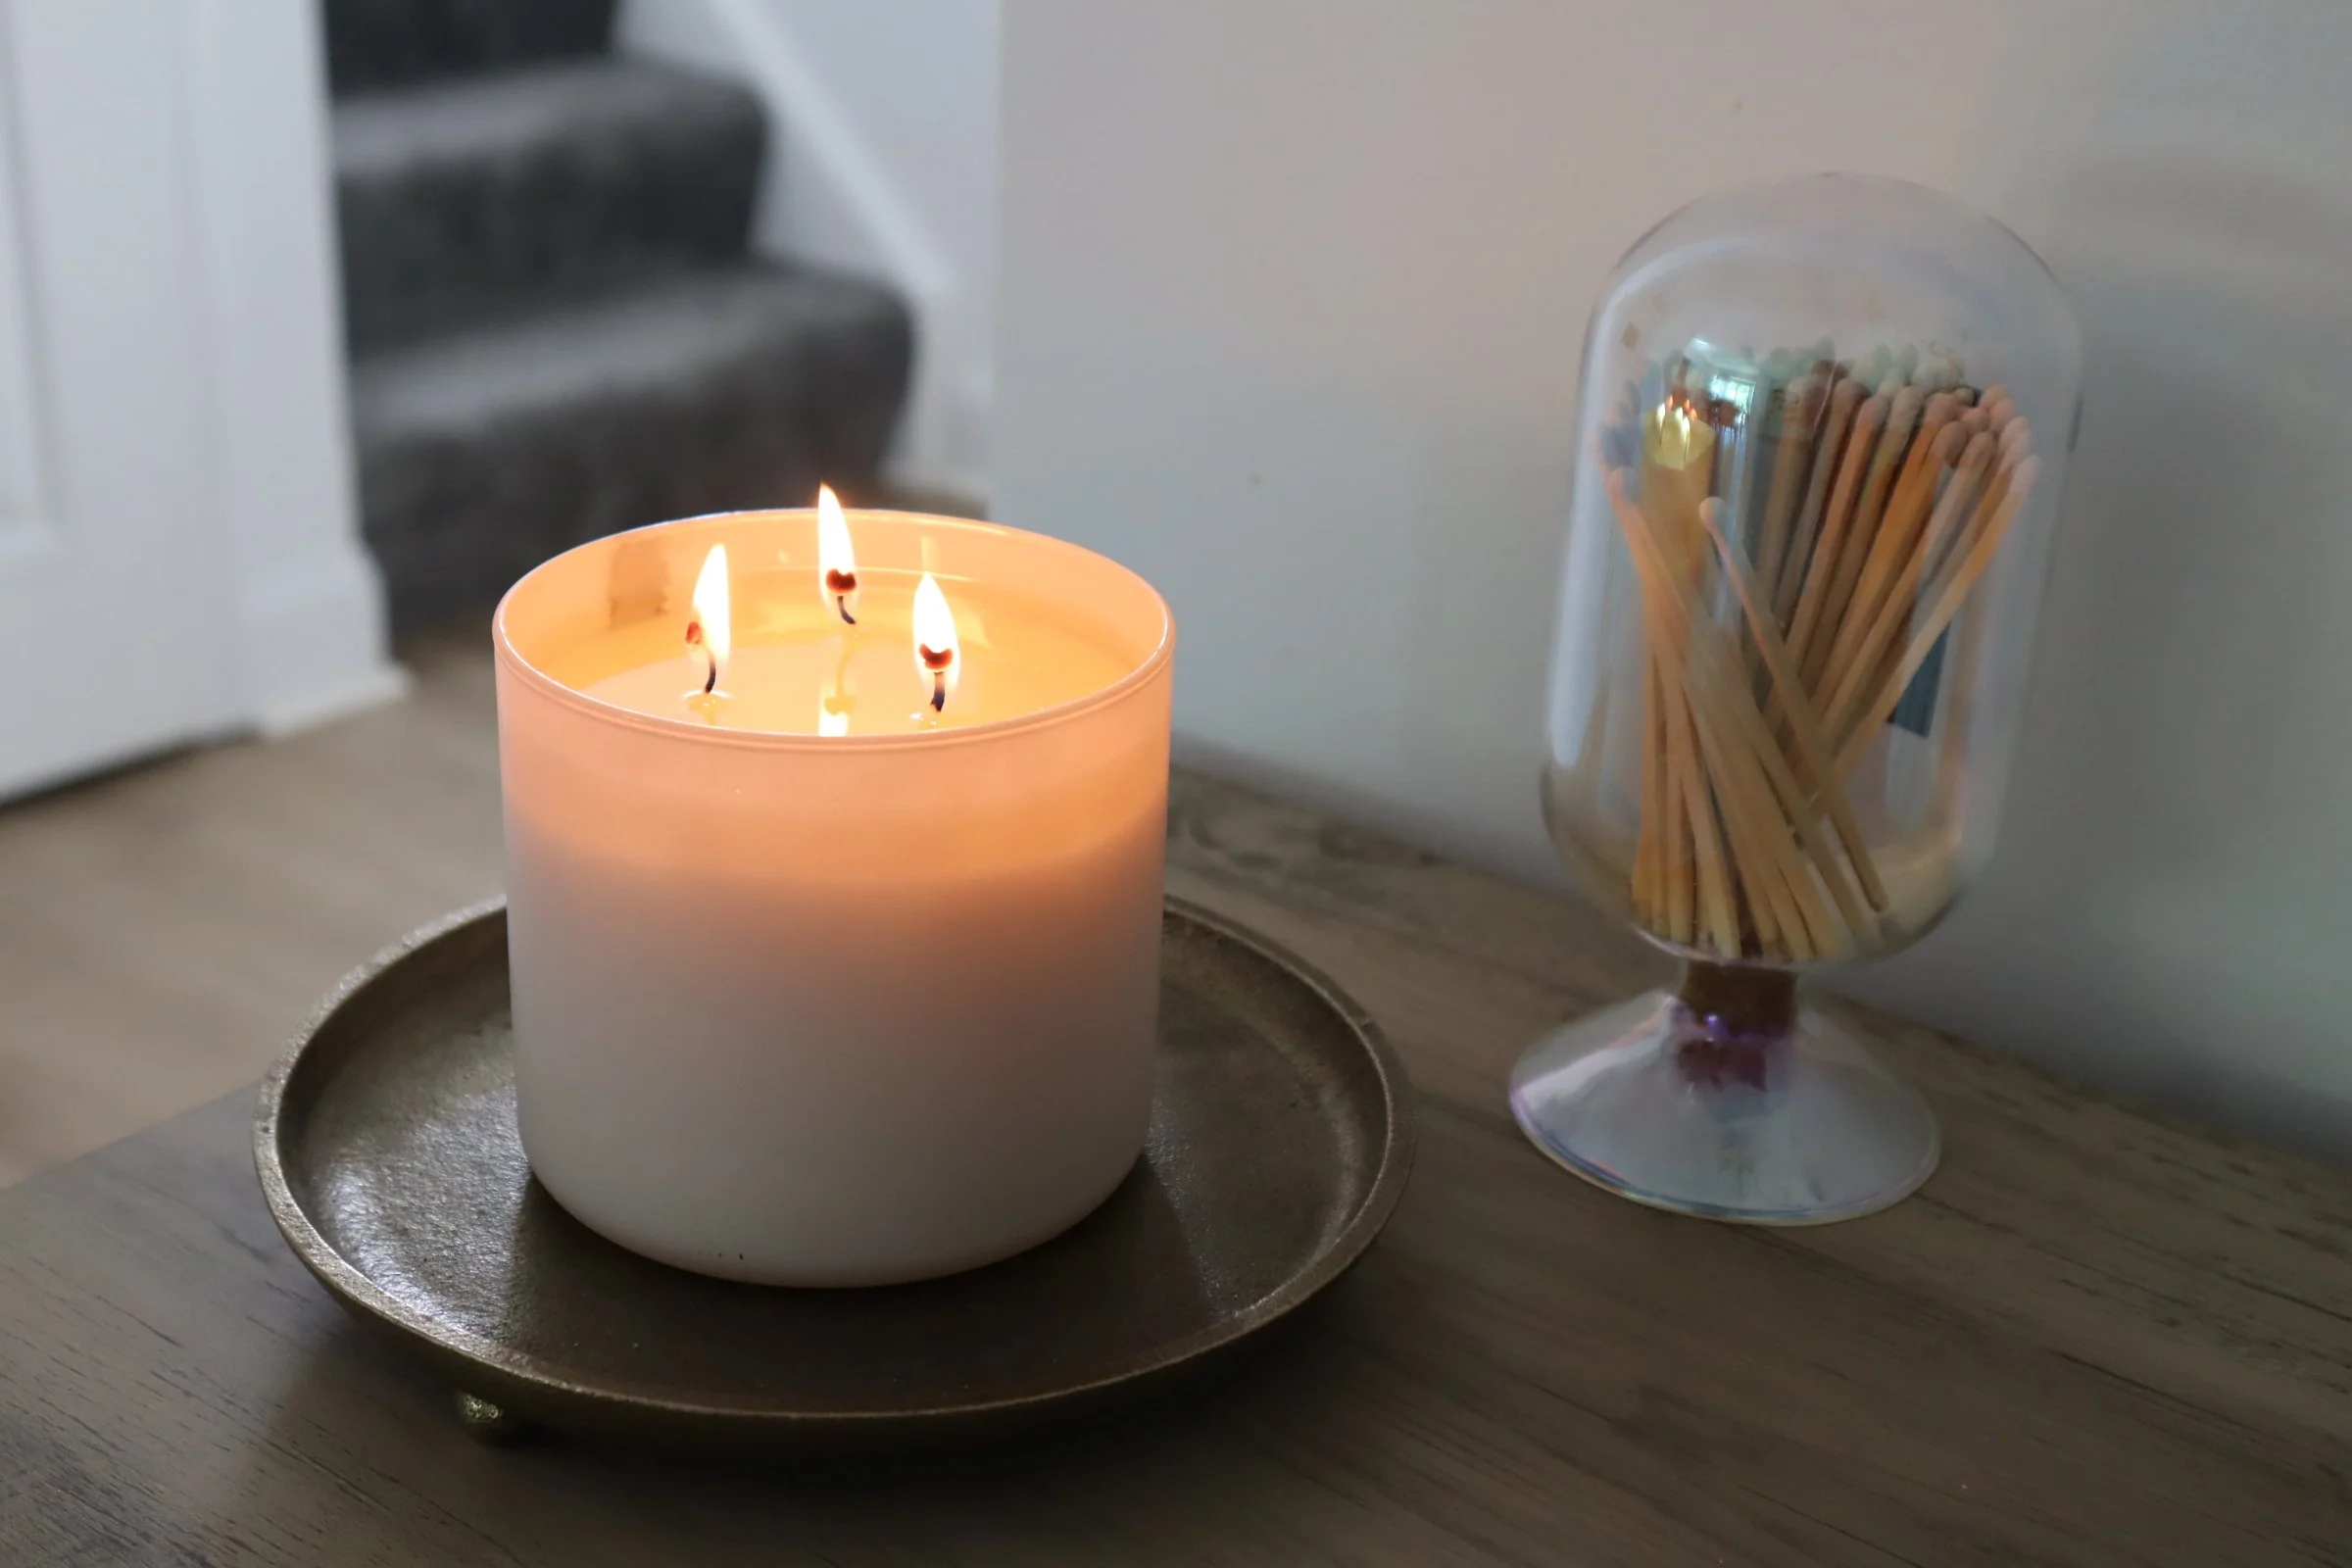
Hand-poured and officially glowing. It smells sooo good.
There’s nothing like the soft glow of a candle at the end of a long day. It creates instant calm—whether you’re winding down for the night or getting the house ready for guests. The gentle light and subtle scent bring a cozy, welcoming feel that makes a space feel more like home. And the best part? You can make your own. There’s something so satisfying about crafting a candle that smells sooo good you can’t stop sniffing it. And when that warmth and scent fill the room just right—it’s the kind of moment that makes you pause and smile.
Candles don’t just bring warmth and fragrance—they can also bring in personality. I love using containers that already have meaning, like an old favorite candle jar or a thrifted mug. It’s a small way to make your home feel more personal and intentional, one cozy flicker at a time.
In this post, I’ll show you how to make your own soy candles, why soy wax is my go-to, and how to use essential oils (instead of synthetic fragrance oils) to keep things wholesome and healthy.
Why Make Your Own Soy Candles?
There are plenty of reasons to try your hand at candle-making, but here are my top few:
1. It’s cleaner and safer for your home.
Soy wax is made from soybeans, which means it’s renewable and natural. It burns much cleaner than paraffin, which is a petroleum byproduct that can release toxins when burned. With soy wax and essential oils, you’re avoiding unnecessary chemicals in your space.
2. You control everything that goes into it.
You get to choose the scent, the look, the container, the wax, and even the wick. You don’t have to settle for overwhelming fragrances or colors that don’t match your style. Everything can be customized to your preferences and your home.
3. It’s a meaningful, creative ritual.
There’s something calming about the process of melting, blending, and pouring. It’s slow and intentional, and the result is something that brings beauty and comfort to your space. It’s also a beautiful gift idea for friends and family.
4. It’s eco-friendly and cost-effective.
Repurposing old jars, containers, or mugs keeps items out of landfills and helps reduce waste. And once you have your basic tools, making candles is much more affordable than constantly buying new ones.
Shop my favorite soy wax below! (affliate link)
The Role of Essential Oils
When I started making candles, I knew I didn’t want to use synthetic fragrance oils. While they come in endless varieties, many of them contain artificial chemicals, hormone disruptors, and phthalates—all of which I try to avoid in my home.
Essential oils are naturally derived from plants and flowers. They offer real aromatherapy benefits, and the scent is much gentler and cleaner than synthetic perfumes. They may not fill a room as aggressively as some commercial candles do, but for me, that’s part of the appeal—they bring a subtle peace instead of overpowering the space.
And perhaps the best part: essential oils can support how you feel. They can calm, energize, uplift, purify, or simply make a room feel fresh and clean.
What You’ll Need
Here’s what is needed when making candles. You can keep it simple and work mostly with items you already have on hand:
Soy wax flakes
Essential oils
Cotton wick
Wick stickers or hot glue
Heat-safe container (mason jar, old candle jar, ceramic mug, etc.)
Pouring pitcher (or glass measuring cup set in a pan of simmering water)
Skewer or pencil (to hold the wick in place)
Thermometer (optional, but helpful for consistency)
I personally used a small Amazon candle-making kit that came with soy wax, wicks, wick stickers, and a stainless-steel pourer. It’s been handy, especially as I’m still experimenting with new blends.
Shop the set I use below! (affliate link)
For the container, I repurposed one of my old candle jars. It had a simple shape I loved and cleaned up beautifully after the original candle was gone. You can use nearly anything heat-safe—and choosing a container with meaning makes the final product even more special.
How to Make a Soy Candle – Step by Step
Step 1: Prepare Your Container
Clean and dry your jar or container. Stick the wick to the bottom using a wick sticker or a dab of hot glue. If you don’t have a wick holder, place a pencil or skewer across the top of the container and wrap the wick around it to hold it in place.
Step 2: Melt the Wax
Add soy wax flakes to your pouring vessel (either a stainless pitcher or glass measuring cup). Place it in a pot with a few inches of simmering water (double boiler style) and stir gently until the wax is completely melted.
Step 3: Let It Cool Slightly, Then Add Essential Oils
After melting, let the wax cool to about 130–140°F before adding essential oils. This keeps the oils from burning off and helps the scent last. For an 8 oz candle, you’ll want around 40–50 drops total, but you can adjust based on how strong you’d like it.
Step 4: Pour the Wax
Carefully pour the scented wax into your container. Be slow and steady so the wick stays centered. Leave about ½ inch of space at the top. Make sure your wick is still upright and centered as it begins to set.
Step 5: Let It Set and Cure
Let the candle sit undisturbed at room temperature for 24–48 hours. For the best scent throw, allow it to cure for up to a week. Don’t move it while it’s setting—just let it do its thing.
Step 6: Trim the Wick
Once fully set, trim the wick to about ¼ inch. It’s ready to light and enjoy.
Tips for Success
Test different combinations of oils and containers to find your favorite.
Wider containers often give off more scent than narrow ones.
Blend thoughtfully: Citrus oils like lemon and orange fade quickly, but pairing them with base oils like cedarwood, frankincense, or patchouli helps the scent last.
Repurpose with purpose: Old jars, mugs, or teacups make beautiful and meaningful vessels for homemade candles.
Essential Oil Blend Ideas
Here are a few blend ideas to try for your home:
For Relaxing Evenings
Lavender + Vanilla + Chamomile
Rose + Sandalwood + Frankincense
For Fresh, Clean Mornings
Fresh Cut Grass + Lily + Lavender
Orchid + Primrose + Peony
For Seasonal Vibes
Peony + Honeysuckle + Vanilla (Spring/Summer)
Frankincense + Vanilla + Sandalwood (Fall/Winter)
For a recent living room candle, I used a blend of:
Frankincense – deep and resinous, grounding
Sandalwood – smooth and woodsy, comforting
Orchid – soft and lightly floral, just enough to brighten the heavier notes
This combination smells rich and calming, with a spa-like, elegant feel. It doesn’t overpower the room but subtly fills it with warmth and peace. It’s become my go-to candle for reading in the evenings or when we have guests over.
I used about:
15 drops Frankincense
15 drops Sandalwood
15–20 drops Orchid
I added these to the wax after it had cooled slightly and stirred gently to combine.
You can mix and match based on what you love and what you have on hand. Don’t be afraid to test small batches and discover what makes your space feel most like home.
Final Thoughts
Making candles has become one of my favorite home projects. It’s creative, simple, and leaves you with something truly useful and beautiful. Whether you’re crafting a calming blend for yourself, a signature scent for your home, or a thoughtful gift for a friend, soy candles made with essential oils offer a healthier, more meaningful way to enjoy candlelight.
If you’re new to this, start with just one candle in a small jar. Use what you have. See what scents bring you comfort or clarity. And let the process be part of the peace.
By Leah Ann Grace
Tips for How to Style Open Shelves
There’s something undeniably charming about open shelving. Whether it’s a set of floating shelves in the kitchen, a wall of styled bookshelves in the living room, or a few well-placed ledges in the bathroom, open shelves give you a unique opportunity to blend storage with personality. They’re functional, flexible, and—when styled intentionally—they can become one of the most beautiful focal points in your home.
But let’s be honest: open shelves also come with a bit of a challenge. How do you make them look collected and stylish without feeling cluttered or chaotic? How do you strike that delicate balance between too bare and too busy?
If you’ve ever stared at an empty shelf and felt overwhelmed—or if your shelves are full but just not feeling right—this post is for you.
After styling shelves in my own home (and restyling them many times over!), I’ve found a rhythm that works. It’s all about combining beauty with intention, layering pieces that matter, and giving everything a little room to breathe.
Let’s walk through five of my go-to tips for styling open shelves, plus some real-life examples and a few bonus ideas to help you feel confident in your space.
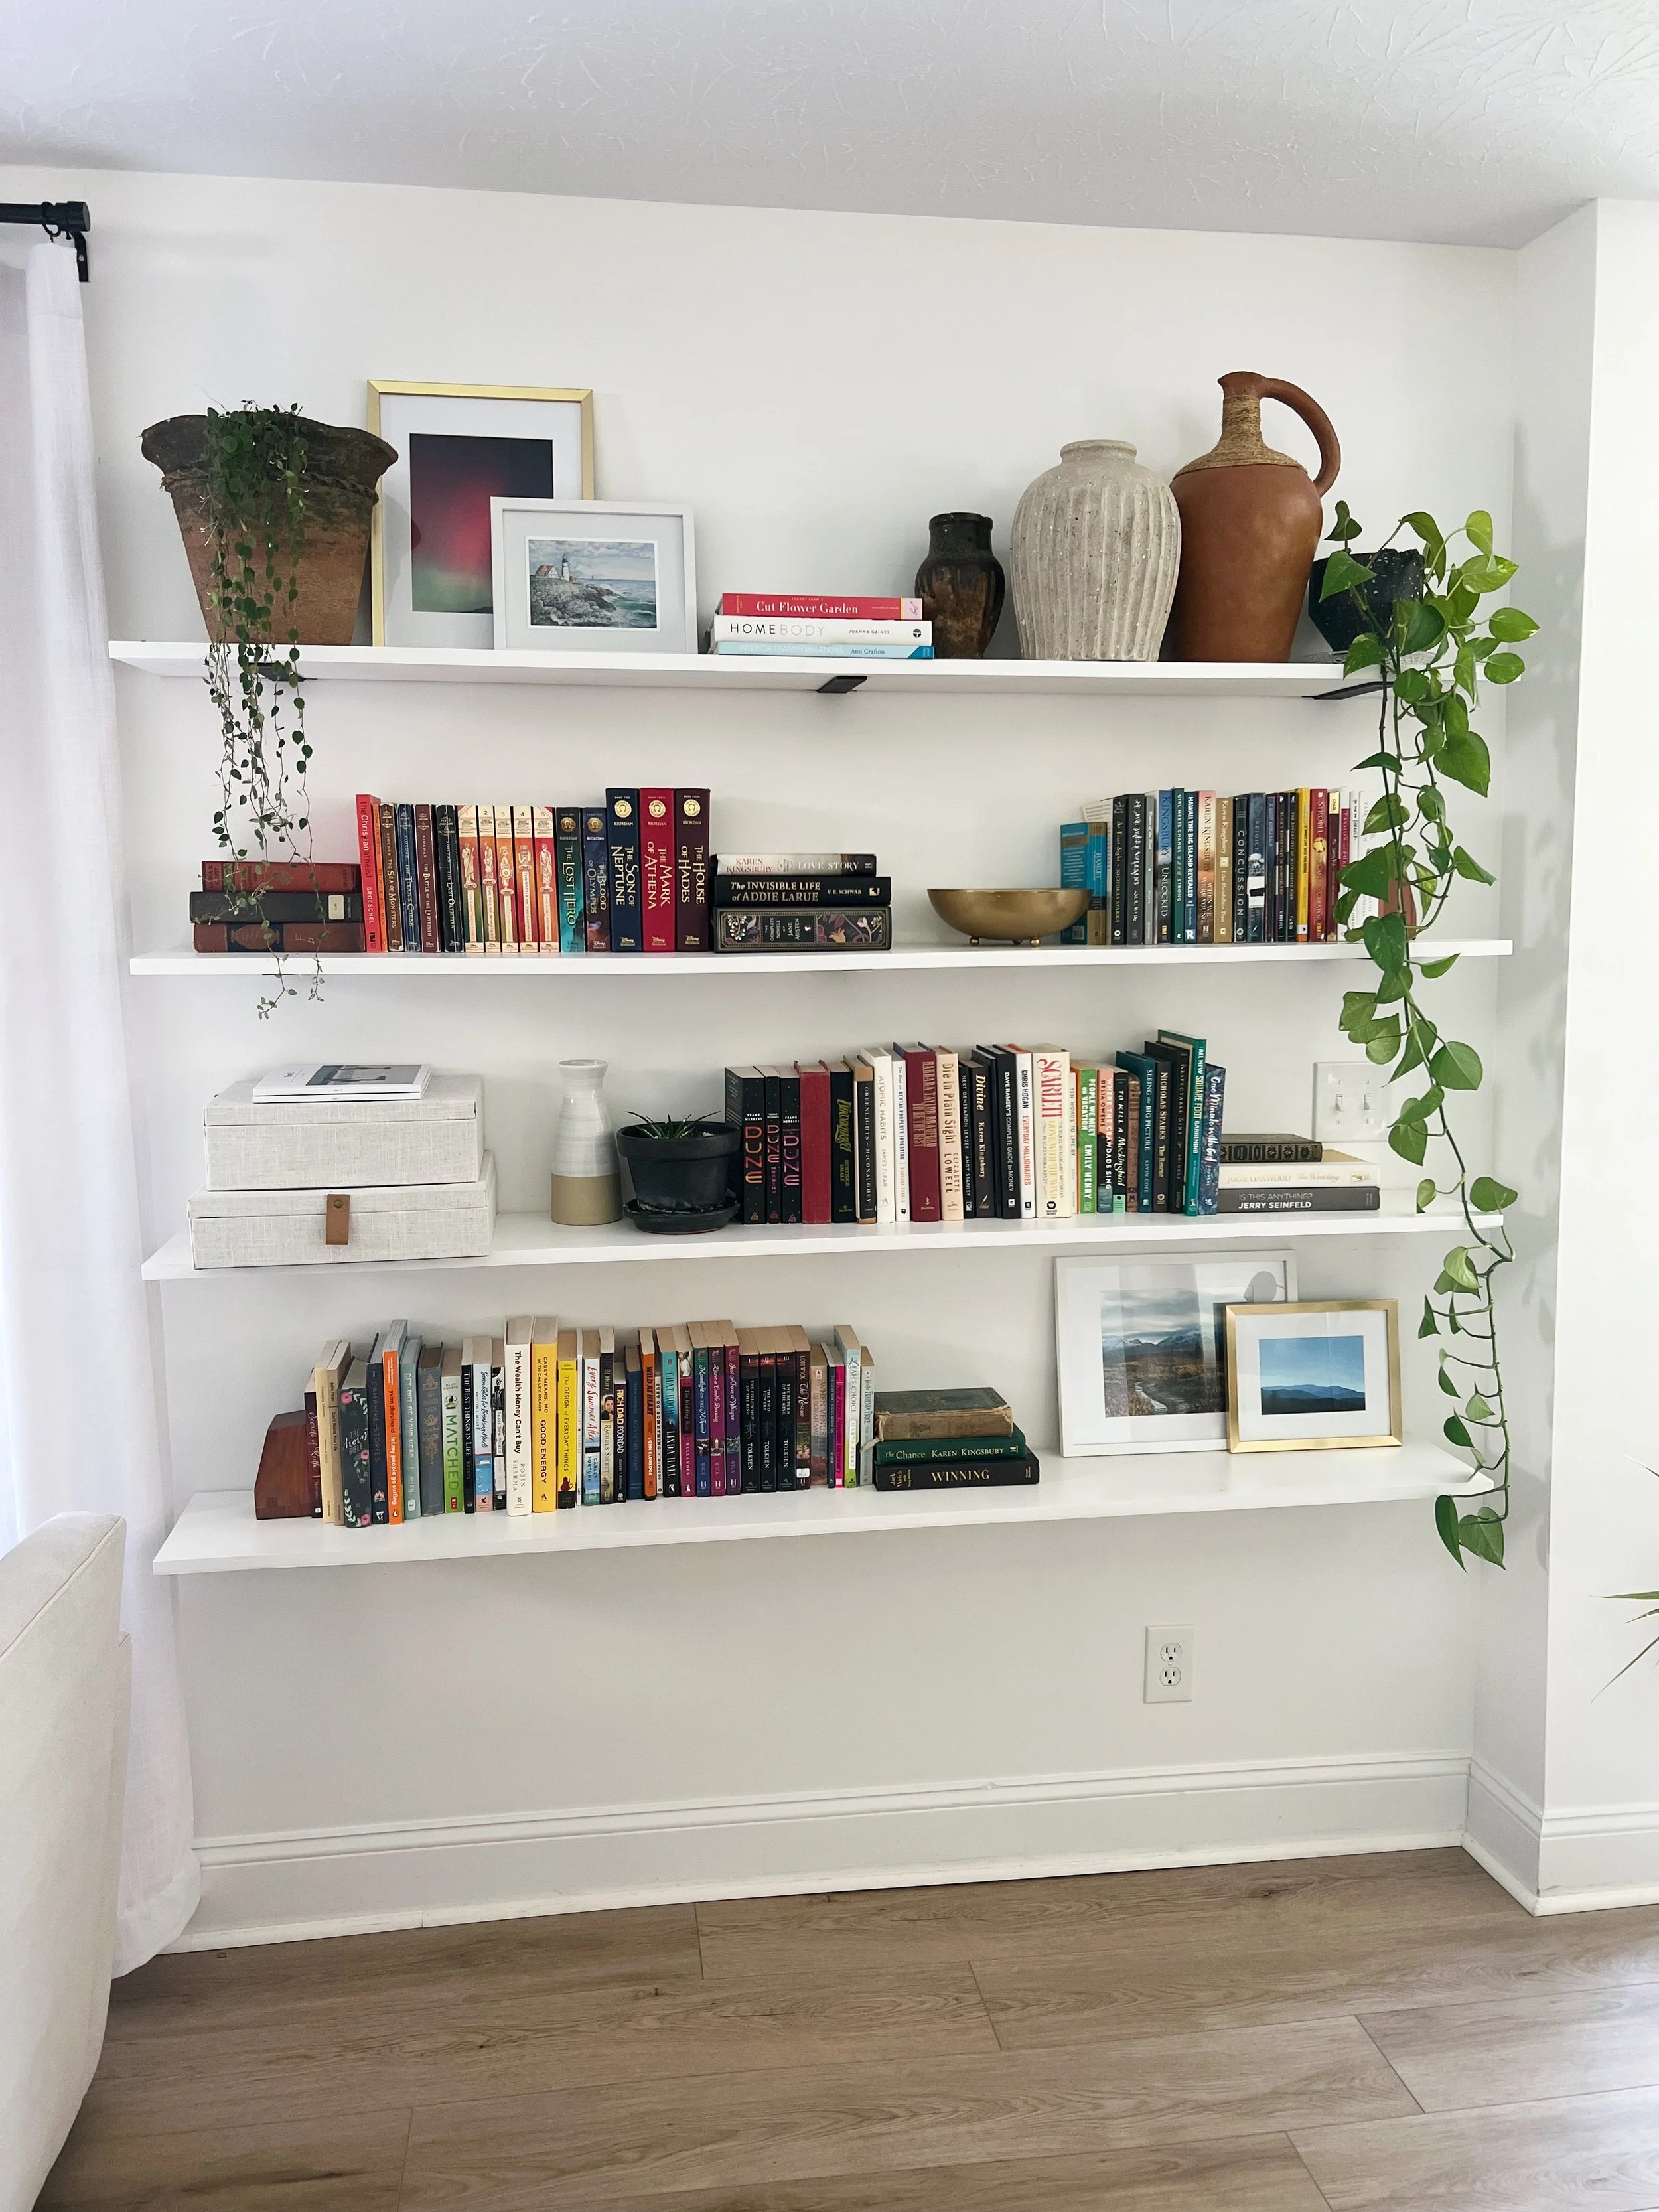
1. Start with a Blank Slate
This might sound simple, but it’s the most important first step: clear everything off your shelves. Every single thing. Wipe down the surface. Take a step back. And take a moment to see the space again.
This fresh start helps remove visual noise and allows you to rethink the purpose and feel of the shelves. Ask yourself:
What do I want this space to say?
Should it feel cozy, clean, collected, or creative?
Do I want this to be mostly decorative, mostly practical, or somewhere in between?
When I styled the shelves in our living room, I knew I wanted them to feel warm, personal, and a little bit rustic. I envisioned a mix of books, handmade pieces, greenery, and family touches—a space that looked like it had grown over time, full of texture and heart.
So before I even put anything back on, I thought through the mood I wanted to create. That vision gave me clarity and helped me make styling decisions with more intention.
2. Use a Balanced Mix of Items
The key to open shelving that feels full but not chaotic is variety with purpose. I always try to include a balanced blend of the following elements:
Books: Upright or stacked. They anchor the space and offer height and structure.
Greenery: Real or faux, plants breathe life into the shelves.
Art: Framed prints or small leaning canvases give visual interest and can tie in colors from the room.
Functional items: Bowls, jars, baskets, mugs—especially in the kitchen or entryway—add beauty and utility.
Personal touches: Vintage treasures, heirlooms, small sculptures, or travel finds make the shelves feel lived-in and real.
For example, on my main shelving wall, I used a mix of:
A trailing pothos plant in a clay pot
Neutral ceramic jugs in varied sizes
Stacks of books—some upright, some lying flat
A textured gold bowl that catches the light
A pair of soft fabric bins for hidden storage
Landscape photos in vintage-style frames
Each piece adds texture or tone, and when viewed together, they create a calming, cohesive look. The shelves feel curated but not staged—like the story of our home told in little vignettes.
3. Create Visual Triangles
If there’s one trick that instantly elevates shelf styling, it’s this: group items in odd numbers and arrange them in triangle shapes.
This might sound overly design-y, but it’s surprisingly simple. Visual triangles guide the eye naturally around the space. They help everything feel balanced—without being perfectly symmetrical.
Try this:
Place a stack of books in the center
Add a small object or bowl to the right
Place a plant or vase to the left
Without even trying, you’ve created a triangle. And your eye will naturally move across that group in a pleasing, intentional way.
On my shelves, I did this with everything from artwork to pottery. For example, one shelf has:
A tall vase with greenery on the left
A short ceramic pot in the middle
A framed photo leaning on the right
The shapes and heights vary, but the triangle brings them together as a set. Once you get the hang of this, shelf styling becomes more about feel than formulas.
4. Leave Breathing Room
This one is harder than it seems: don’t fill every inch. Negative space—those blank spots between objects—is what makes everything else shine.
I used to feel the urge to fill the shelves completely, but I’ve learned that what you leave out matters just as much as what you include.
The top shelf of my wall, for example, has just a few large pottery pieces paired with a leaning print. But what makes it beautiful is the space around them. That openness keeps the shelf from feeling crowded and allows the pieces to stand on their own.
Here’s a tip: after placing a few items, take a step back and ask, “Is my eye resting anywhere?” If it’s darting all over the place, you may need to pull a few things off. Let your items breathe.
5. Add Something Unexpected
This is where your shelves go from styled to special. Slip in something that doesn’t follow the “rules.” A sculptural object. A quirky thrifted bowl. A handmade candleholder. A little moment of surprise.
One of my favorite unexpected elements is a green pothos that cascades down the side of the shelves. It adds softness, movement, and a touch of wildness that keeps the shelf from feeling too polished.
I also tucked in a small framed sketch from a flea market and a ceramic bird I picked up on a trip. These little pieces of joy make me smile every time I pass by—and that’s what great design is all about.
Bonus Tip: Switch It Up Seasonally
One of the best things about open shelving is how easy it is to refresh. In spring, add a vase of tulips or pastel books. In fall, tuck in a little pumpkin or swap your greenery for dried florals. In winter, bring in cozy textures and twinkling lights.
You don’t need to redo everything—just swap one or two items. It keeps your shelves feeling fresh and in tune with the season, without the need for a total overhaul.
Final Thoughts: Let Your Shelves Tell Your Story
Open shelves offer more than just a spot for decor—they’re a canvas for your personality. A place where function meets beauty. A space to layer your favorite reads, everyday items, beloved keepsakes, and little sparks of creativity.
The most beautiful shelves aren’t the ones that follow every design rule—they’re the ones that reflect the people who live there.
So clear the clutter. Think through your vision. Layer in your favorites. Let some space breathe. And don’t be afraid to add a little whimsy.
Try these tips on your next shelving project and enjoy the fresh, grounded feeling that beautifully styled open shelves bring to your home.
By Leah Ann Grace
Entryway Styling: Welcoming Guests with Warmth
This post contains affiliate links for products I use in my home. I may earn a small commission if you shop through these links, at no extra cost to you.
Your entryway is more than just a pass-through—it’s the first impression guests have when they step into your home. It’s where you drop your keys, hang up your coat, and take a deep breath after a long day. It’s also where your home begins to speak—visually and emotionally—about who you are and how you live.
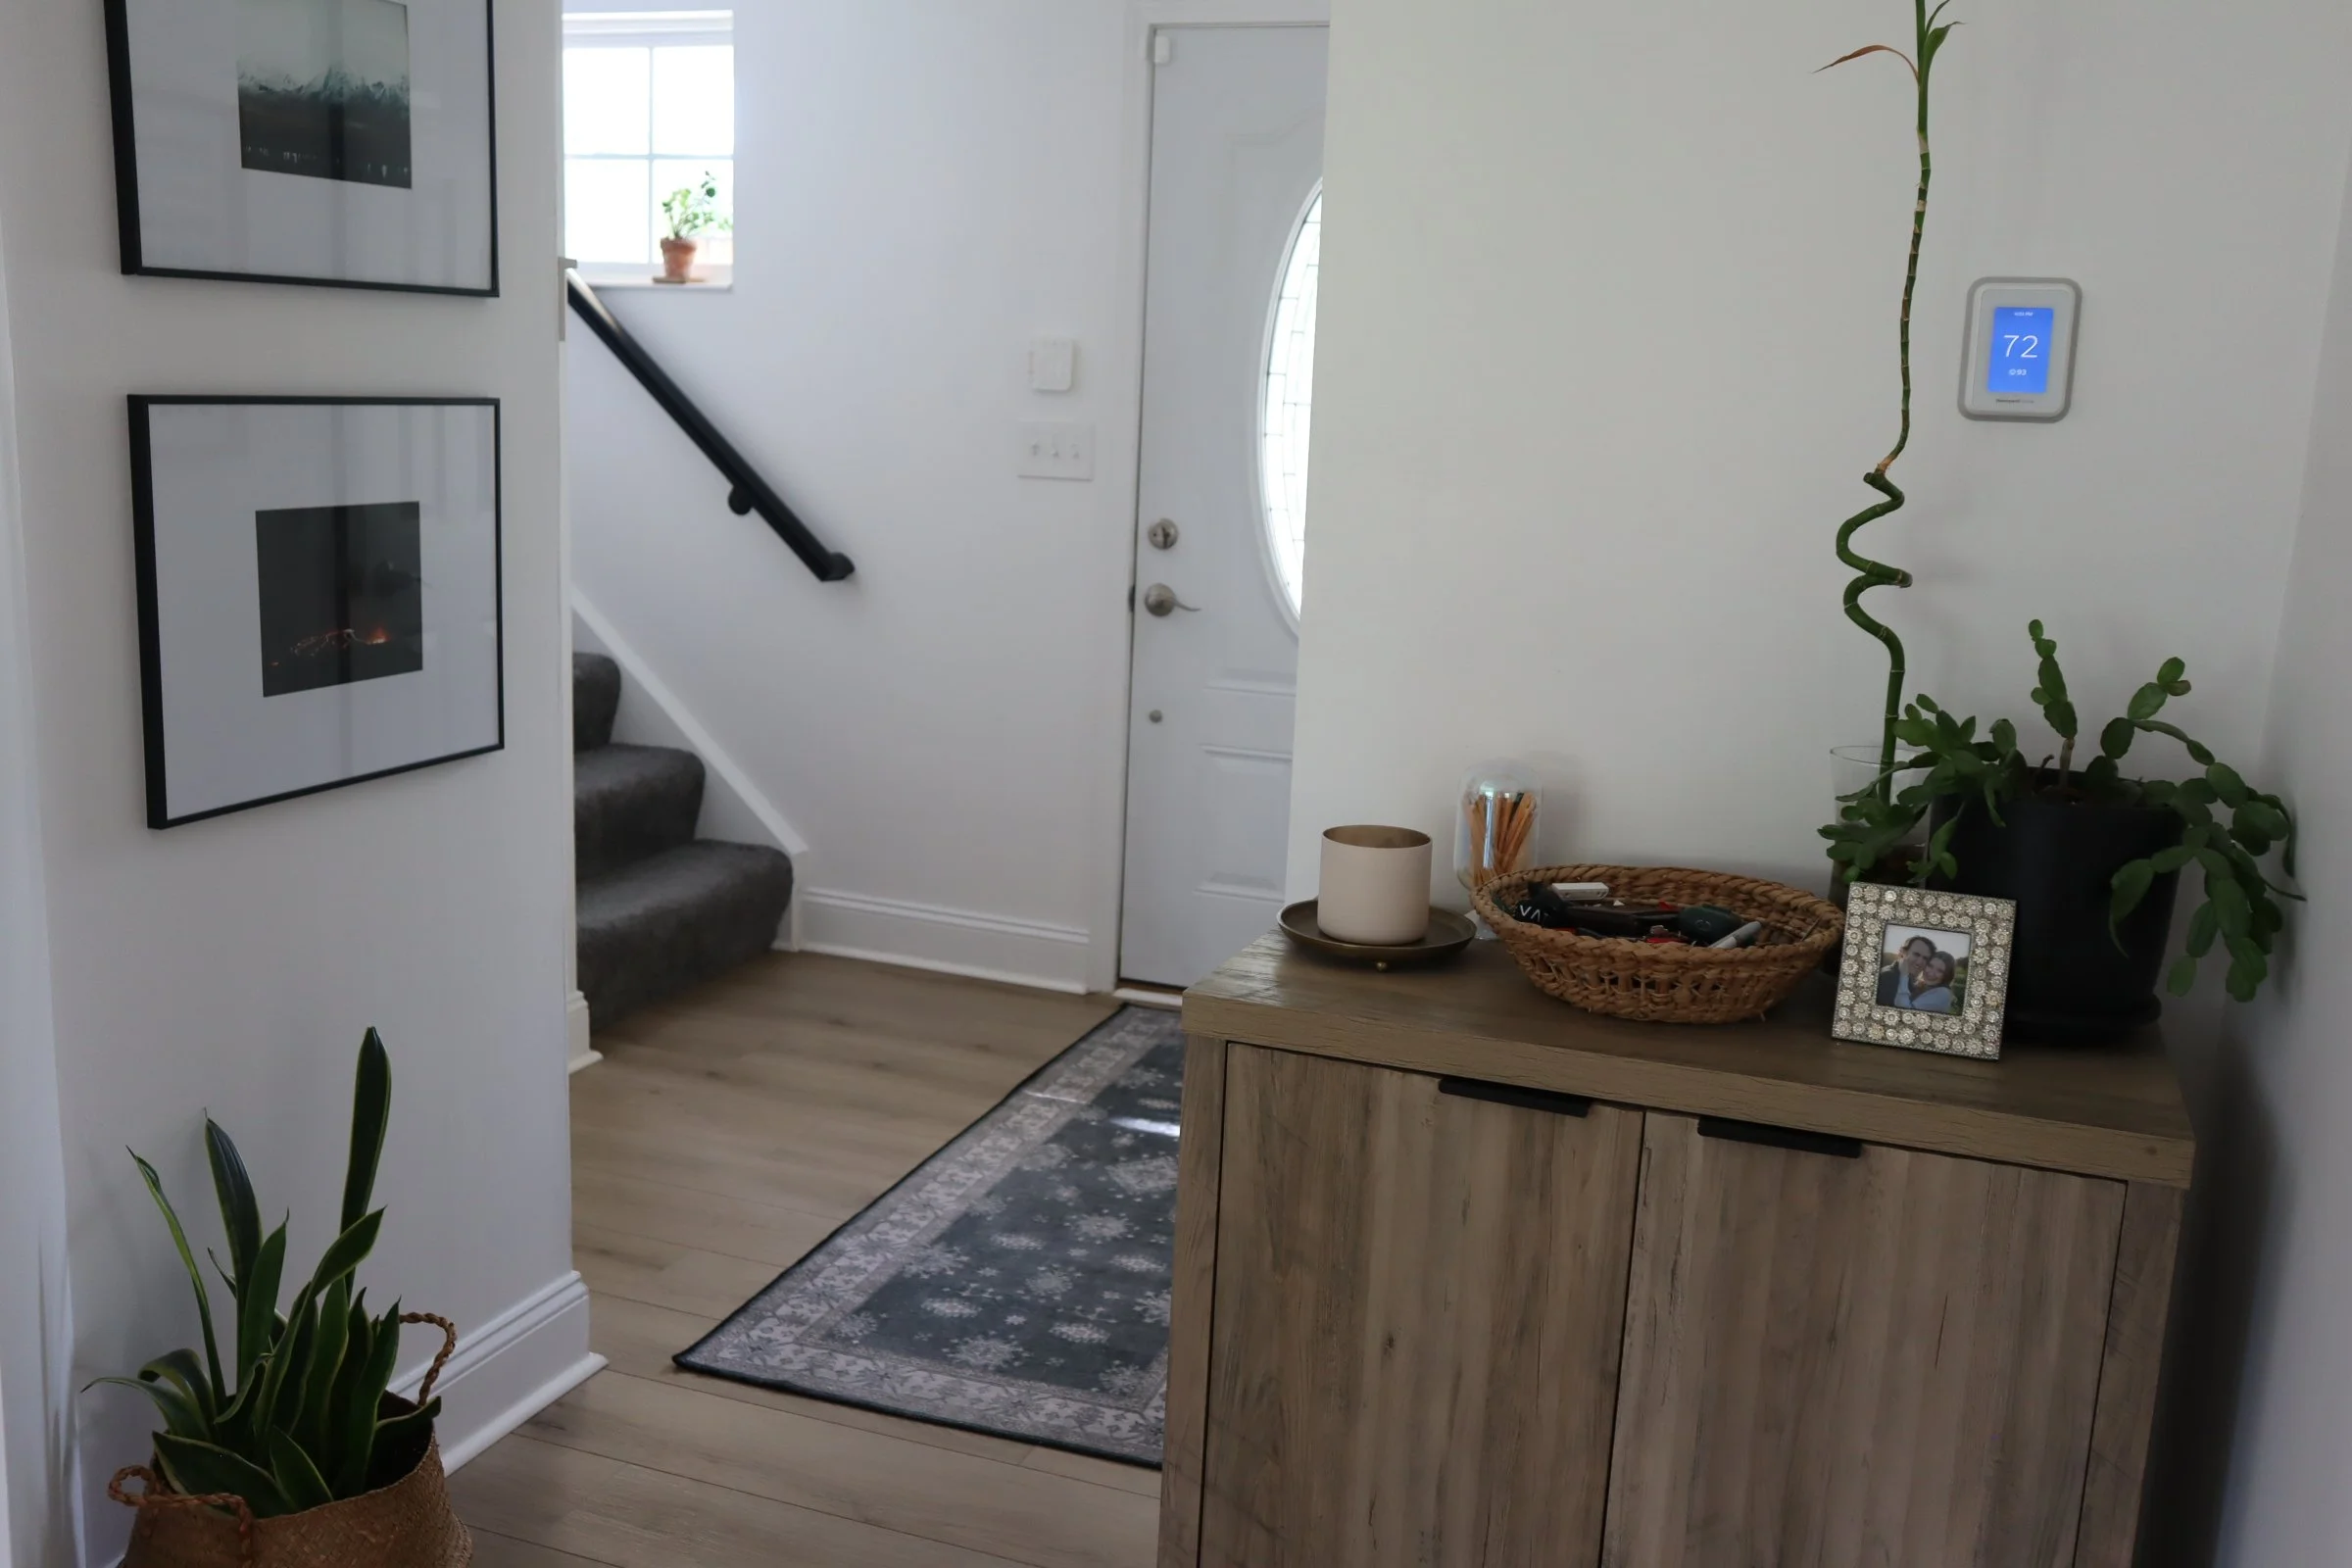
When styled with care, this small but significant space has the power to set the tone for your entire home. Whether your entryway is a grand foyer or just a small nook by the door, there are thoughtful ways to make it functional, beautiful, and filled with warmth. Here's a peek inside how I styled my own entryway and some ideas to inspire yours.
Create an Inviting Atmosphere Right From the Door
Designing a welcoming space starts with thinking about how you want the room to feel. For me, that meant starting with warmth—both in color and mood. One of the easiest ways to do this is through a well-chosen rug. I selected a charcoal-colored runner that plays beautifully against our crisp white walls and soft blonde floors. The contrast adds a sense of depth and coziness while gently defining the entryway from the rest of the home.
This runner also adds a layer of texture underfoot, which helps make the space feel more grounded and complete. Rugs are such a powerful tool in design, even in smaller spaces—they can introduce pattern, color, and comfort all at once.
If your entryway is feeling flat or disconnected from the rest of your home, start with a rug. Choose something durable enough to handle foot traffic but beautiful enough to make a statement. You’d be surprised how much it can transform the vibe.
Functional Furniture That Doesn’t Sacrifice Style
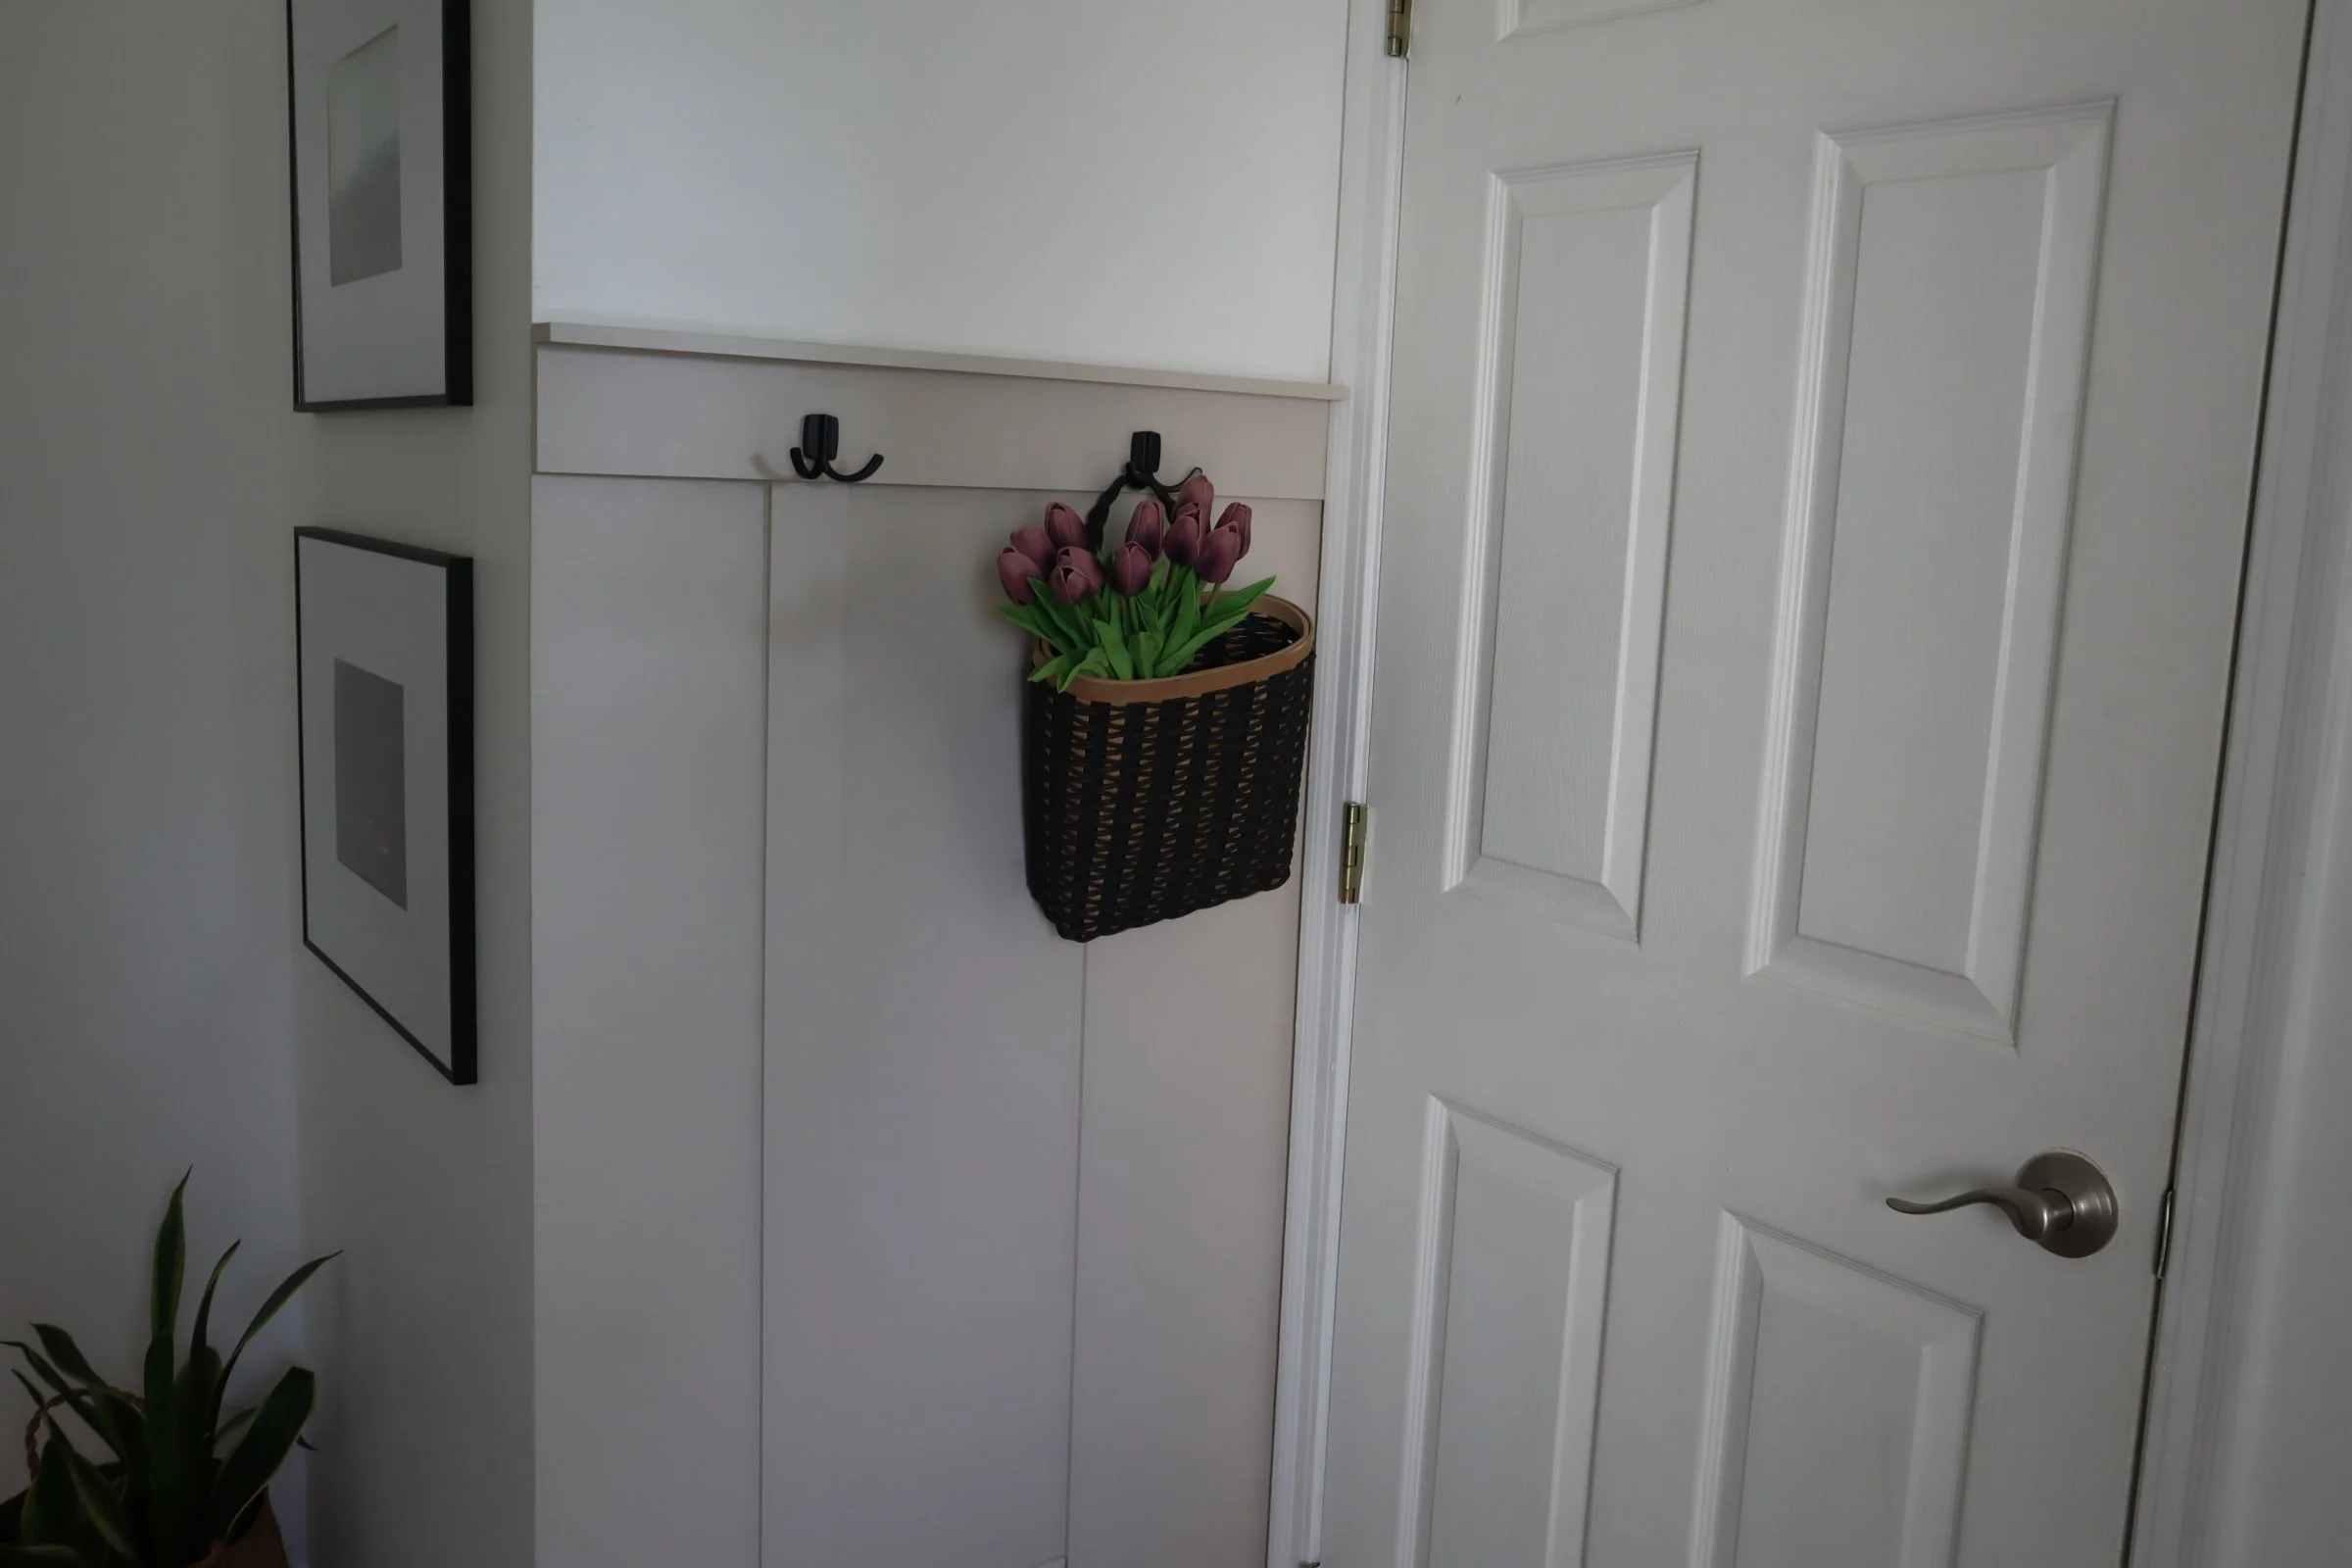
Let’s be honest—entryways need to work. You want somewhere to store shoes, stash keys, hang bags or jackets, and maybe even sit to put on your shoes. But not every entryway has the space for all of that.
In my case, there wasn’t room for a traditional bench or console table, so I got creative. We installed board and batten paneling with hooks directly onto the wall. This solution checked both boxes: it added beautiful architectural detail and created a super practical spot to hang coats, hats, and bags.
Hooks are one of my favorite design tools in tight spaces. They take up zero floor space, yet offer maximum function—and when styled right, they also add charm and texture to the wall.
Just around the corner from the door, I added a low-profile storage cabinet that holds shoes neatly out of sight. This has been a game changer for keeping our entryway clutter-free. On top of the cabinet, I placed a small woven bowl that acts as a catch-all for keys, lip balm, or whatever else ends up in your hands when you walk in the door.
This kind of thoughtful storage helps the entryway stay tidy without feeling sterile. And it’s proof that even small-scale furniture can pack a big punch in a tight space.
Want to see the cabinet I use? I’ve linked it for you here (affiliate link).
Add Personal Touches That Tell a Story
While function is essential, it’s the personal touches that make an entryway truly feel like home. This is your chance to introduce a little personality right from the start—without needing to go overboard.
In my own space, I love including things like framed art or family photos, a mirror to bounce light and make the space feel bigger, and always a touch of greenery. Whether it’s a vase of fresh flowers or a little potted plant, greenery instantly softens the space and brings it to life.
A favorite trick? Use a mirror with character—something with a wood frame, antique finish, or unexpected shape. Not only will it make your entryway appear larger and brighter, but it also adds a layer of interest that welcomes the eye.
Even just one or two thoughtful pieces here—like a small art print that makes you smile, or a handmade bowl from a special trip—can make the whole entryway feel like a reflection of you.
Let Lighting Set the Mood
Good lighting is essential in any room, but it plays a special role in the entryway. This is the first light you (and your guests) see when entering the home—so it matters.
Because my entryway is quite compact, I didn’t have the option of adding a lamp or sconces. Instead, I chose a decorative overhead light fixture that provides just the right amount of warmth and style. It’s subtle but impactful—a design detail that feels intentional without taking up any extra space.
If you have more room, consider adding a lamp to a console table or wall sconces for a cozy glow. Layered lighting like this makes a space feel more finished and inviting. And even better—it makes those early-morning departures and late-night returns feel just a little softer.
Keep It Tidy (Without Losing Charm)
A cluttered entryway can quickly become a stress point in a home. That’s why I like to build in smart storage solutions that keep things tidy without losing visual appeal.
Baskets are a go-to for me—great for shoes, scarves, or even umbrellas. Wall-mounted shelves can hold bins or display a few decorative items. And a simple tray on a surface can corral keys, sunglasses, or incoming mail so it doesn’t pile up.
Whatever tools you use, the goal is the same: keep the things you need close at hand, but don’t let them take over the space. When everything has a place, your entryway becomes more than just a landing zone—it becomes a peaceful pause between the outside world and the comfort of home.
Your Entryway, Reimagined
When styled with care, the entryway is so much more than just a hallway or small square footage by the door. It becomes a warm welcome, a daily reset, and a visual introduction to the heart of your home.
Whether your space is big or small, you can create an entryway that is:
Functional for your everyday needs
Visually warm and pulled together
Infused with personality and charm
Organized without sacrificing style
And the best part? You don’t need a major remodel or huge budget to get there. With a little creativity and intention, even the smallest entry can make a big impact.
I hope this inspires you to take a fresh look at your own entryway and reimagine what it could be. Because your home should feel like you—right from the moment you step inside.
By Leah Ann Grace
Welcome to My Home (and My Heart for Design)
Welcome to My World of Intentional Design
There’s something magical about walking into a space that just feels right—where comfort, beauty, and function come together seamlessly. That’s the kind of home I love to create—not just for myself, but for others too. I believe every space has the potential to become a sanctuary, tailored to reflect the people who live in it and support the way they live every day.
As someone who’s always been drawn to the details, I see design as a blend of storytelling and problem-solving. I’m the color queen—give me a palette, and I’ll bring it to life. My eye for color lets me pull together tones and textures that others might not imagine pairing, but that work together to create warmth, energy, and harmony.
Design, for me, is like a game of spatial Tetris—figuring out what fits where, how it functions, and how to make it beautiful in the process. I love the challenge and the creativity that comes with it. Whether it’s styling a small entryway, reimagining a living room layout, or finding clever ways to make everyday spaces more efficient and joyful, I thrive in the details and delight in the big picture.
In my own home, you’ll see my personality in every corner. I love to mix traditional and modern elements—clean lines alongside classic shapes, antique finds with fresh finishes. My go-to color palette? Think burnt orange, soft creams, crisp whites, aged golds, earthy reds, and lush greens. And always, plants. Lots of them. They bring life, warmth, and a little bit of the outside in.
This space—this blog—is a place where I’ll share creative ideas, design tips, and inspiration for curating a home that’s not only beautiful, but deeply personal and practical. Whether you’re here for fresh ways to style a shelf, make your kitchen work smarter, or simply enjoy the art of home, I’m so glad you’re here.
Here’s to designing with heart and living beautifully—
By Leah Ann Grace
For as long as I can remember, I’ve loved using texture, color, and pattern to create spaces that feel inviting, comfortable, and personal. There’s something powerful about walking into a room and instantly feeling like it just fits—not just aesthetically, but in how it supports your everyday life. That harmony between beauty and function is what I’m always striving for in my designs. I don’t just want a space to look good; I want it to feel like home.
I believe that our homes are more than just a collection of furniture and walls. They are living reflections of who we are—our stories, routines, values, and creativity all wrapped into one physical place. I’ve learned over the years that the right colors, the right furniture arrangement, and even the right lighting can completely shift how a space feels—and in turn, how we feel when we’re in it. That emotional connection to a space is what truly fuels my love for design.
Where It All Began
Design has been part of my life for as long as I can remember. Even as a kid, I loved rearranging my room just to see how different layouts made the space feel. I’d play with color schemes, layer my bed with pillows in just the right way, and even style the bookshelf over and over until it looked “just right.” At the time, I didn’t know that what I was doing was called interior design—I just knew that it made me feel alive.
That creative spark led me to study Industrial and Innovative Design in college, where I spent two years exploring digital architectural design and developing conceptual interiors. It was there that I learned not just the how of designing spaces, but the why. Why we gravitate toward certain colors. Why furniture placement matters. Why natural light can make or break a room. That foundation helped shape the way I view every space I walk into, whether it’s a blank canvas or a lived-in family room in need of a refresh.
After college, I dove into the design world professionally, working in home design and helping others create spaces that reflect their unique lives and personalities. But for me, design didn’t stay at work—it followed me into my home, my hobbies, and my everyday moments.
My Style: A Mix of Timeless & Lived-In
If you stepped into my home, you’d quickly see that I’m drawn to warm tones and layered textures. I’ve always had an eye for color—it comes naturally to me to see how tones relate, balance, or contrast in a way that brings life to a room. I tend to lean toward a palette of earthy burnt oranges, soft whites and creams, rich greens, muted golds, and the occasional touch of burnt red. These tones feel warm, grounded, and inviting—just the kind of mood I want to create.
One of my favorite things to do is blend traditional and modern styles. I love the character and charm of classic design, but I also appreciate the clean lines and simplicity of modern pieces. The balance of the two creates a look that feels fresh and current, but still timeless and enduring. Whether it's a sleek sofa paired with a vintage side table, or a modern pendant hanging over a rustic wood dining table, I love finding harmony in the contrast.
Of course, texture plays a huge role in making a space feel alive. I use soft linens, woven baskets, cozy rugs, rustic woods, smooth ceramics, and glass accents to add depth and interest. And then there are the plants—always the plants! I am a firm believer that greenery adds an unmatched sense of vibrancy and comfort to a home. Whether it's a tall fiddle leaf fig in the corner, trailing pothos on a shelf, or a tiny succulent on a nightstand, plants are my favorite finishing touch.
Designing with Purpose
Design, to me, isn’t just about decorating—it’s about intentional living. A home should support the people who live in it. It should flow well, feel comfortable, and function in a way that simplifies daily life. Whether it’s finding the right layout for your family’s rhythm, carving out a nook for your morning coffee, or creating a workspace that inspires creativity—those little moments of thoughtfulness make all the difference.
Sometimes, it’s as simple as rearranging a room to make it feel more open and connected. Other times, it’s choosing a paint color that brings warmth or calm, depending on what the room needs. And often, it’s in the little details—layering throw pillows, adding soft lighting, or displaying meaningful art—that a space starts to truly feel like home.
I’ve learned that the most beautiful homes are not the ones that are perfectly styled or magazine-ready, but the ones that tell a story. A space that holds meaning. A space that invites people in and makes them feel seen and at ease.
What You’ll Find on This Blog
This blog is my little corner of the internet where I’ll be sharing the creative heart behind home design. You’ll find:
Design tips that are approachable and practical—because good design shouldn’t be intimidating.
Room inspiration and layout ideas for making the most of your space, no matter the size.
Color palettes that help you create warmth, balance, and personality in your home.
DIY projects and seasonal styling to help your space evolve with the rhythms of life.
Behind-the-scenes of my own home—what I’m decorating, rearranging, planting, or dreaming up next.
And maybe a few unexpected surprises—because I believe that home is also where creativity, beauty, and joy live.
This blog is for the design lover who wants their space to feel both beautiful and lived-in. It’s for the person who lights a candle at the end of the day to relax, who loves to tweak the throw pillows just one more time, who finds joy in making the ordinary feel a little more special.
Let’s Create Spaces That Feel Like Home
Whether you’re designing a new home from the ground up or just moving the furniture around in your living room, I hope this space encourages you to approach your home with creativity and intention. You don’t need a big budget or a design degree to create something beautiful—you just need a heart for home and a willingness to get inspired.
I’m so glad you’re here. Let’s make our homes not just look good—but feel good, work well, and reflect the beautiful, everyday stories of the people who live in them.
Welcome to the blog! Let’s design something meaningful together.
By Leah Ann Grace